Contents
- 01Why Turning On a Tube Amp Is Different From Any Other Gear
- 02What the Standby Switch Actually Does
- 03Step-by-Step: How to Turn On a Tube Amp Correctly
- 04Tube Rectifier vs. Solid-State Rectifier: Does It Change the Startup Procedure?
- 05How to Turn Off a Tube Amp Correctly
- 06Vintage Fender Amp-Specific Startup Notes
- 07Common Tube Amp Startup Mistakes and What They Actually Do to Your Amp
- 08FAQ: Tube Amp Startup Questions Answered
- 09Quick-Reference Startup Checklist
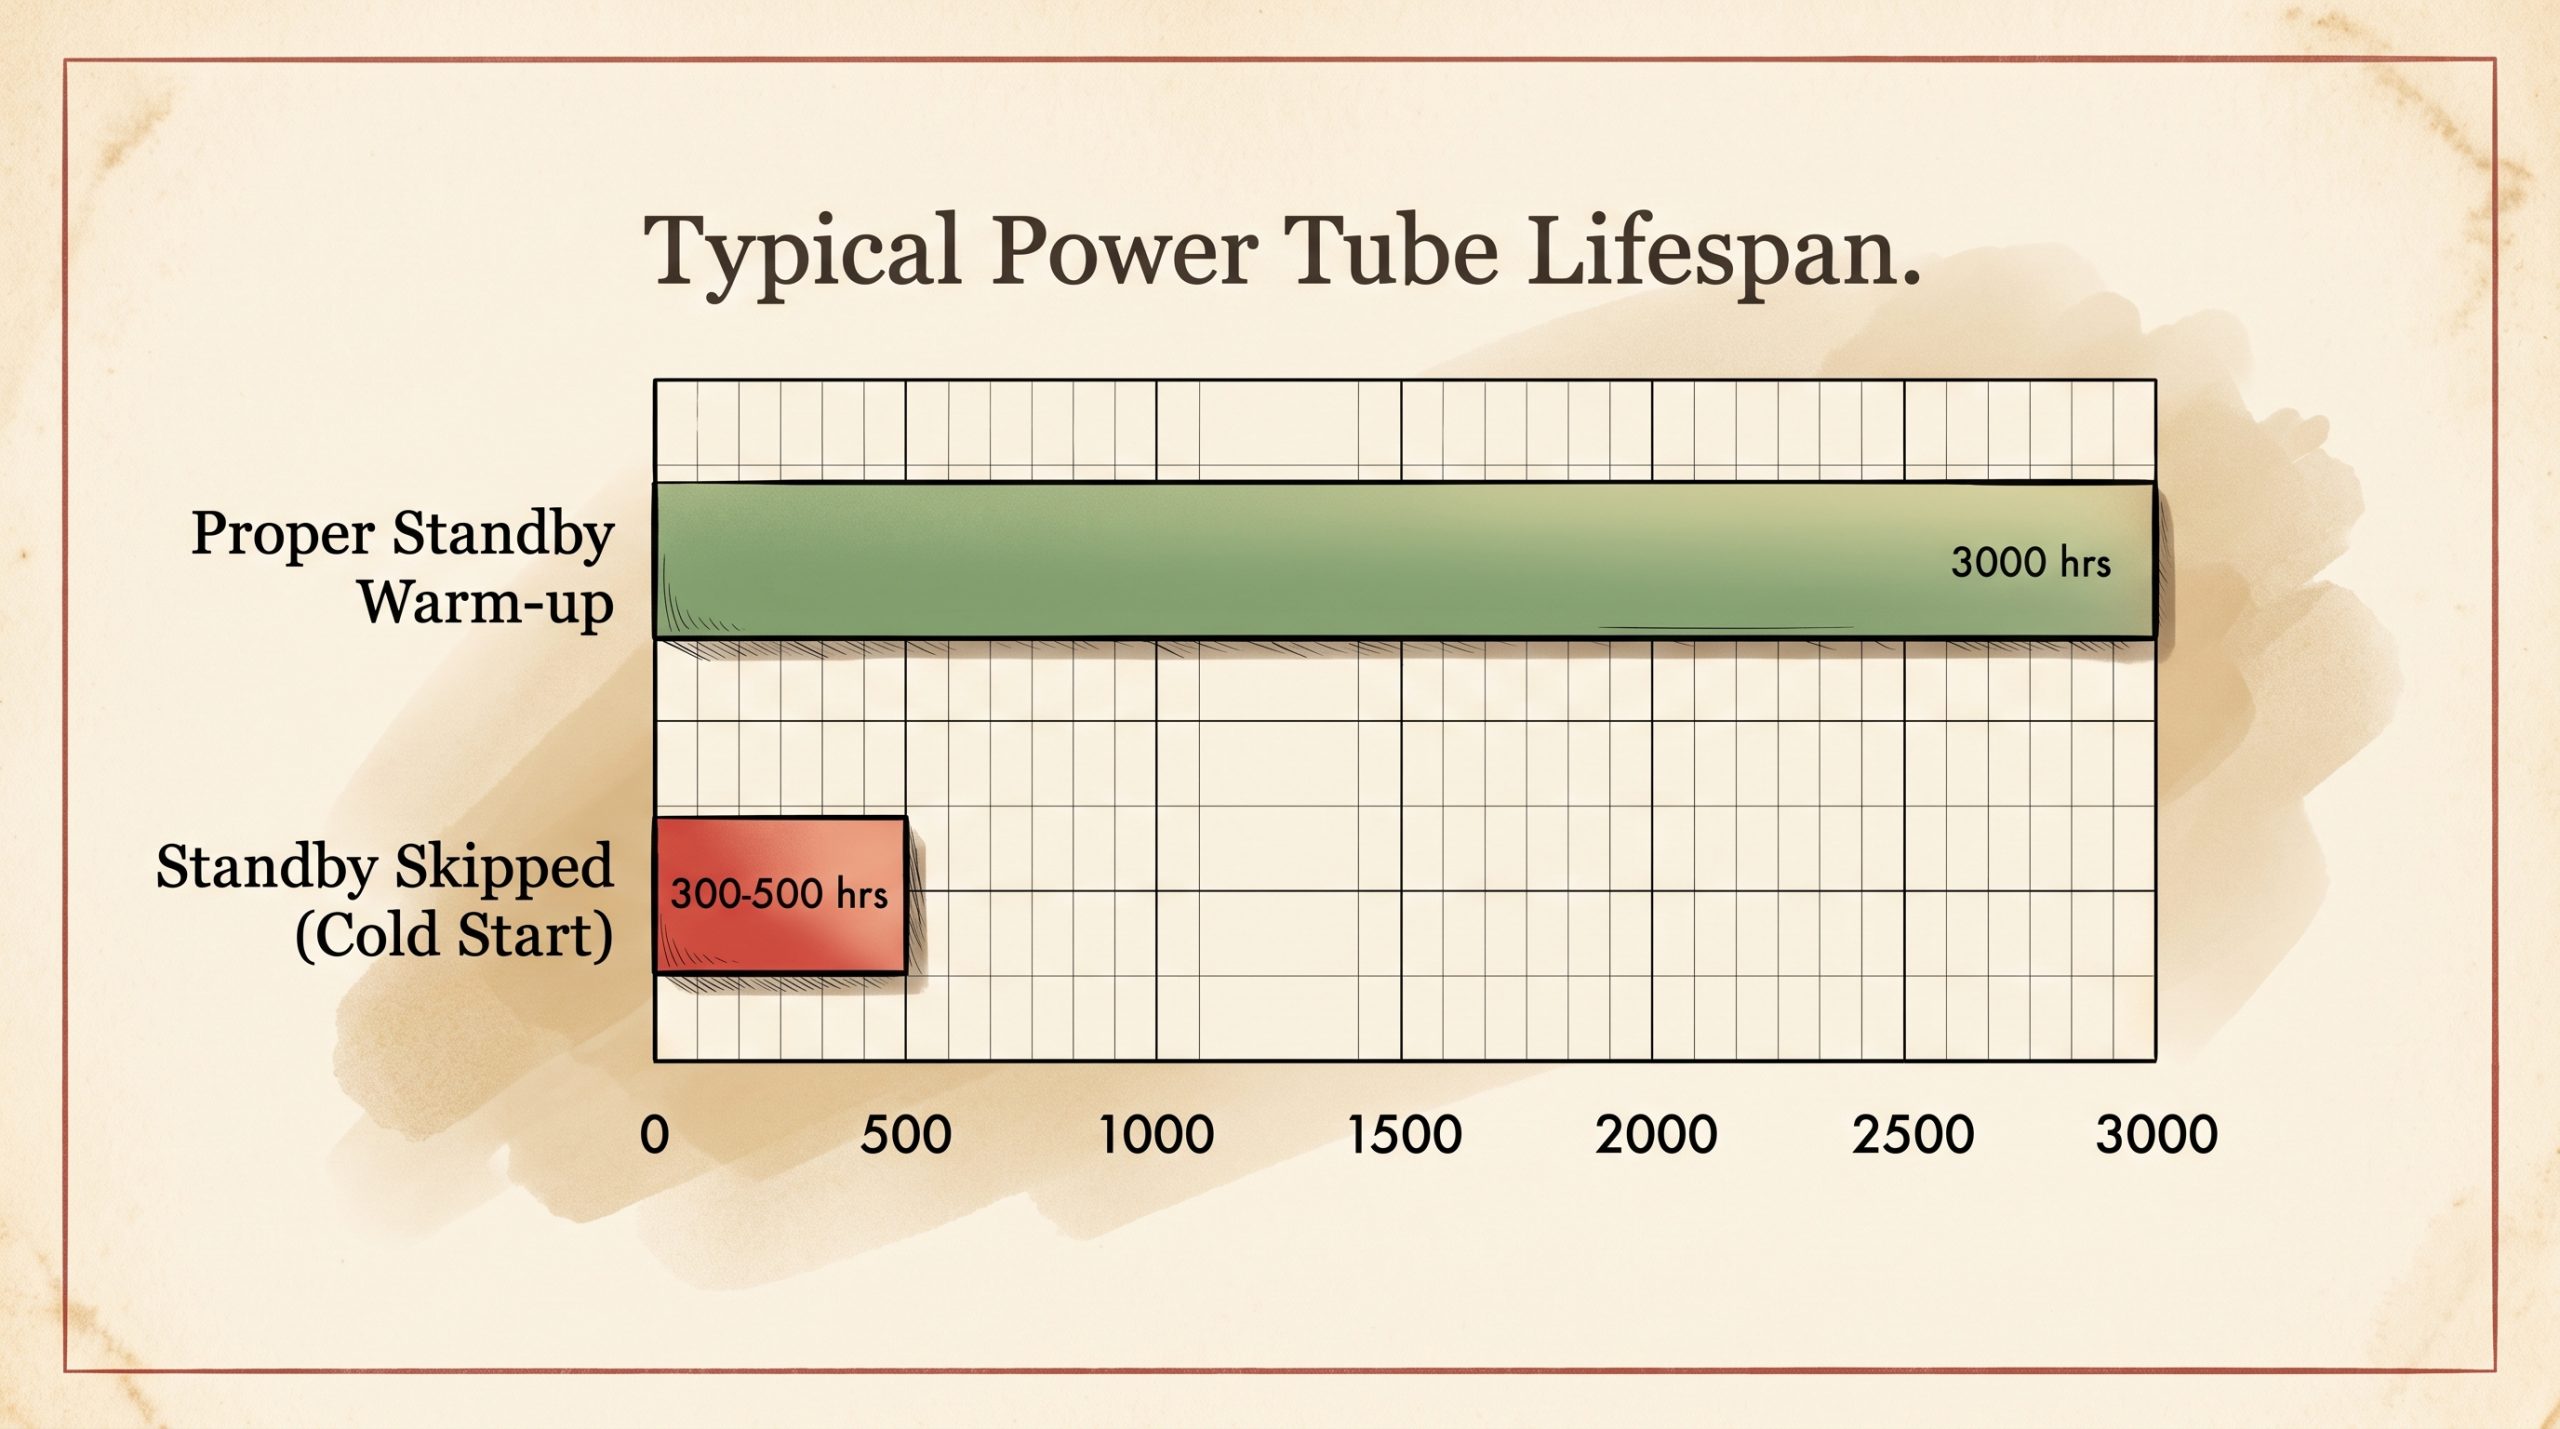
At 480 volts DC, the B+ supply in a silverface Fender Twin Reverb hits the power tubes in less than one second when a solid-state rectifier is in the circuit. If those tubes are cold, that voltage spike lands on an oxide cathode coating that isn’t ready for it. The result isn’t immediate failure. It’s slow, cumulative damage that cuts tube life from 3,000 hours down to a few hundred. The standby switch exists specifically to prevent that.
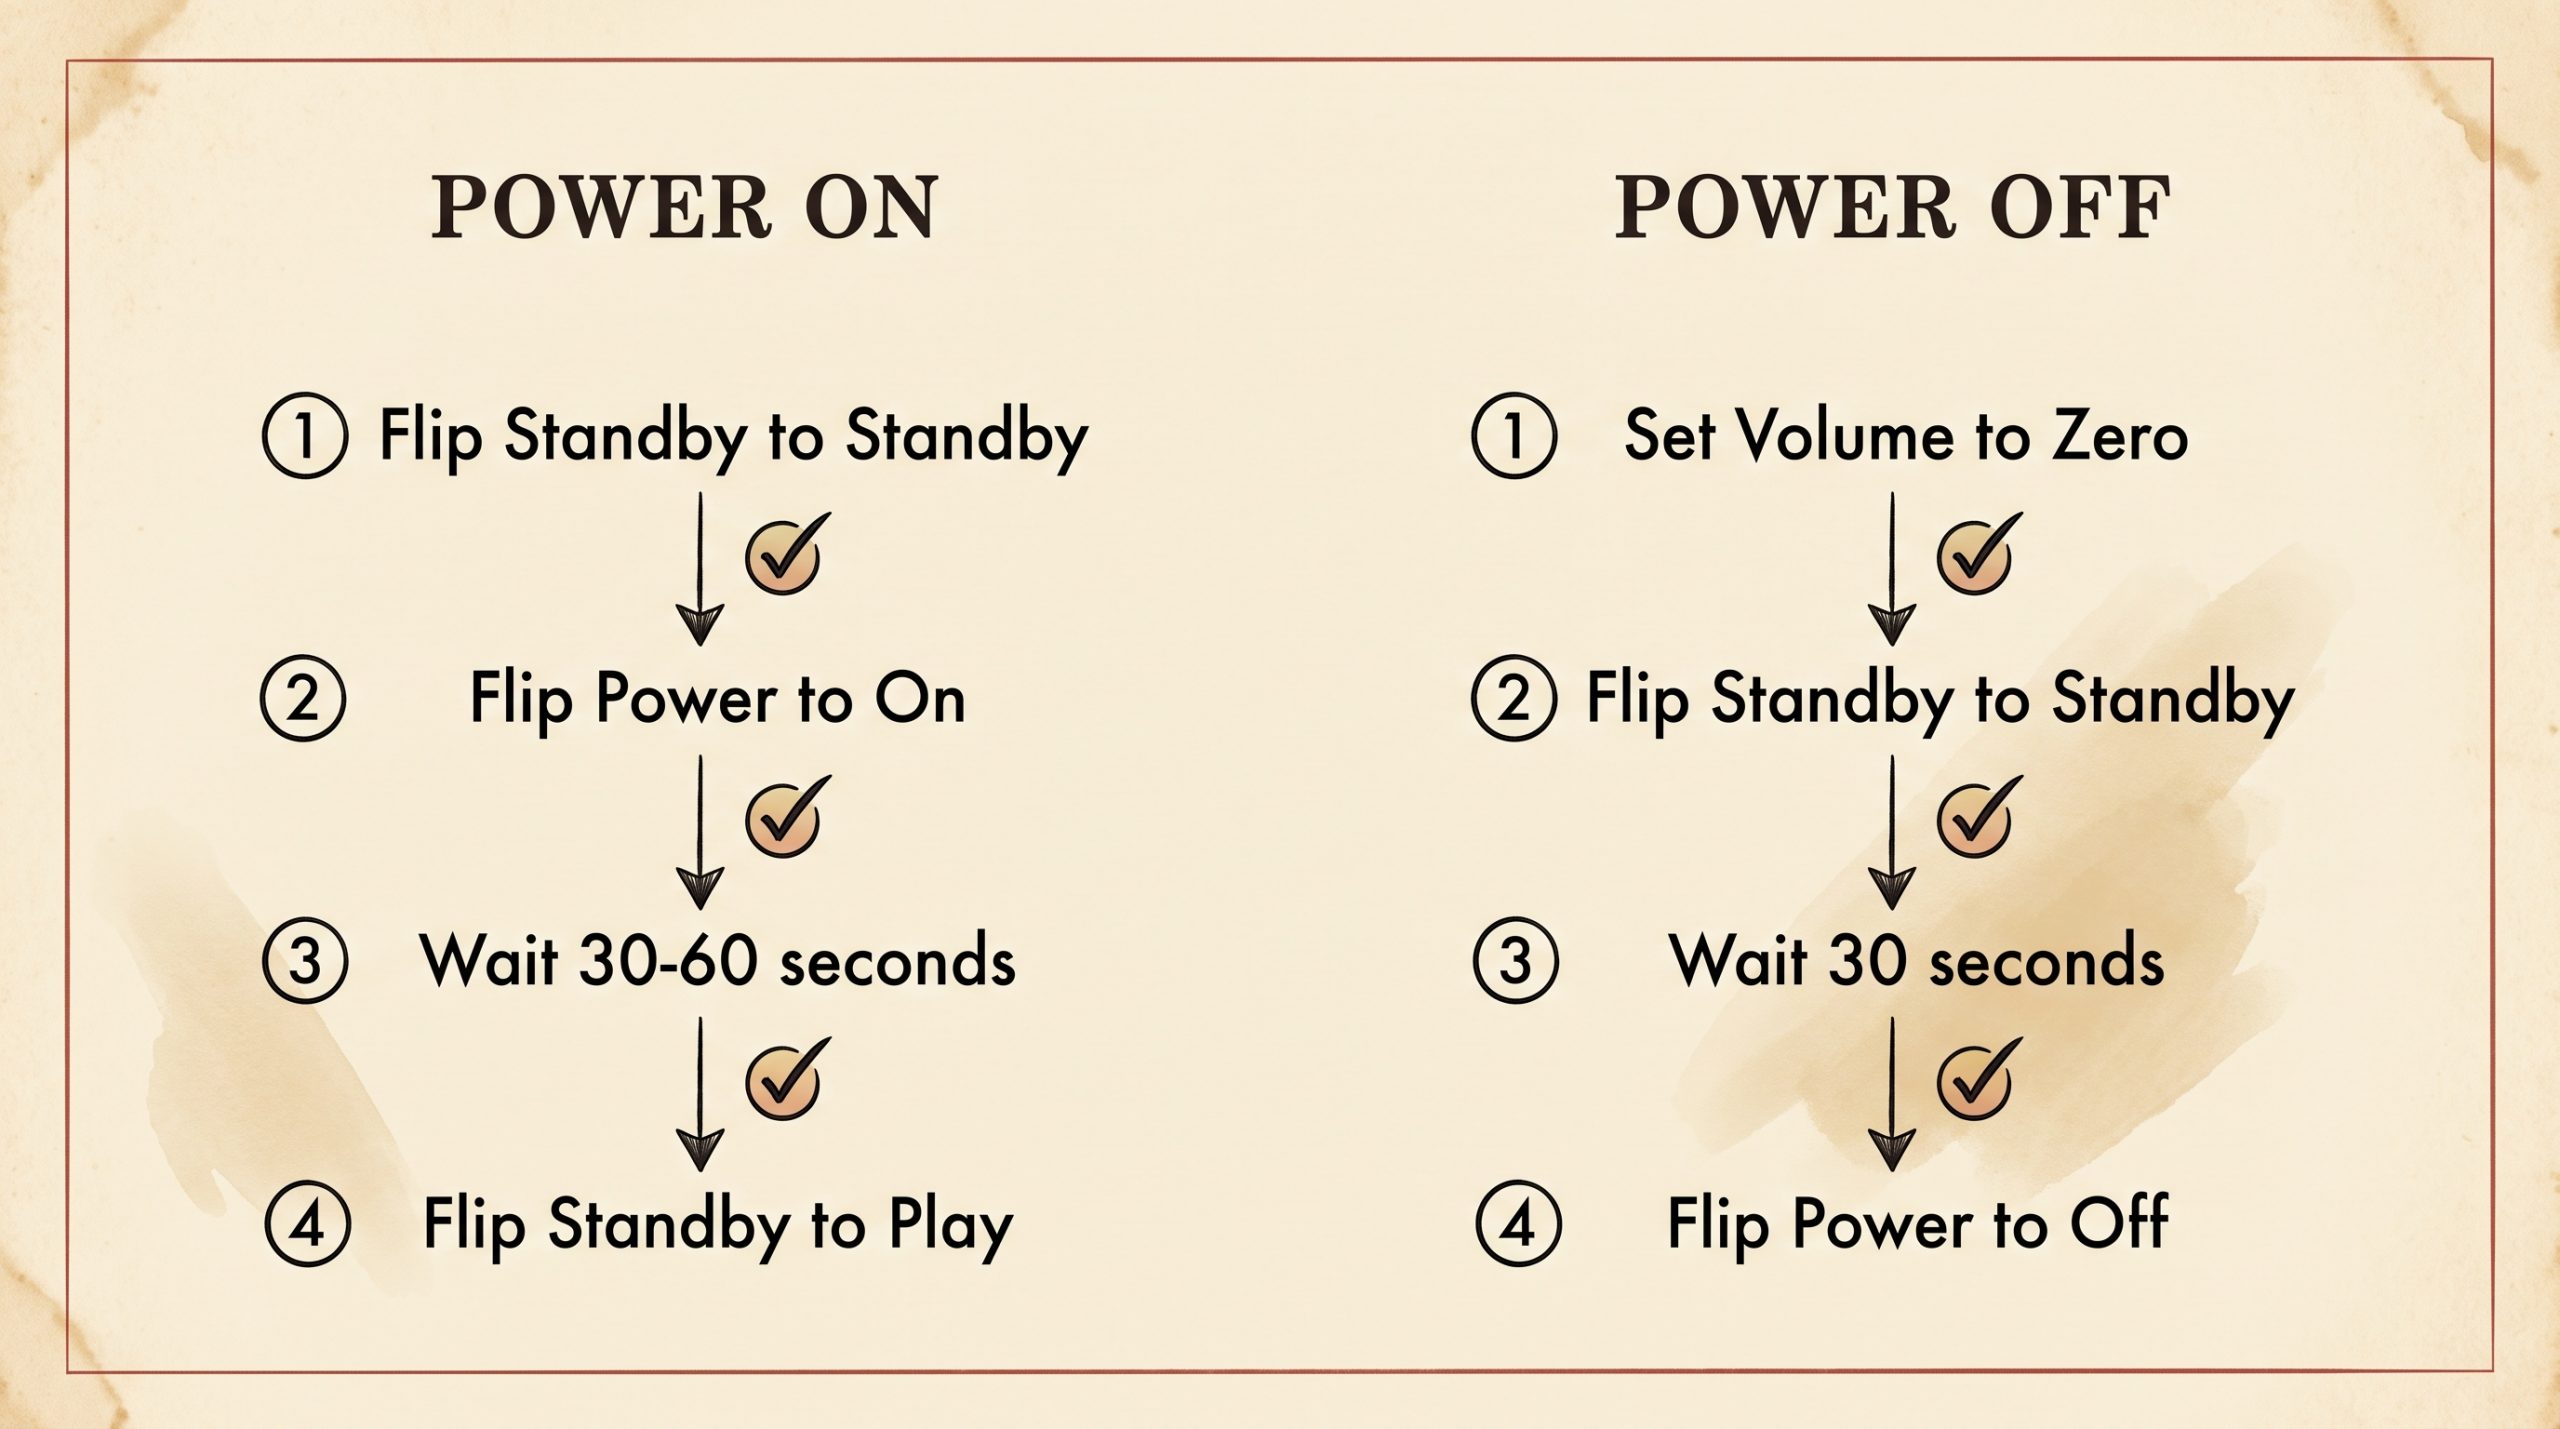
- Correct power-on order: Standby to “Standby” first, then Power to “On”
- Minimum warm-up time: 30 to 60 seconds in standby before flipping to play
- Correct power-off order: Volume to zero, Standby to “Standby,” wait 30 seconds, then Power to “Off”
- Amps without a standby switch (many tweed-era Fenders): power on, wait 60 seconds, play at low volume first
- Solid-state rectified amps (silverface Twins, many imports): standby use is critical, not optional
- Skipping standby warm-up on a solid-state rectified amp applies full B+ to cold tubes, cathode coating damage is not reversible
- Leaving an amp in standby indefinitely is not harmless: heaters running continuously at 6.3VAC still generate heat and wear cathode coatings over time
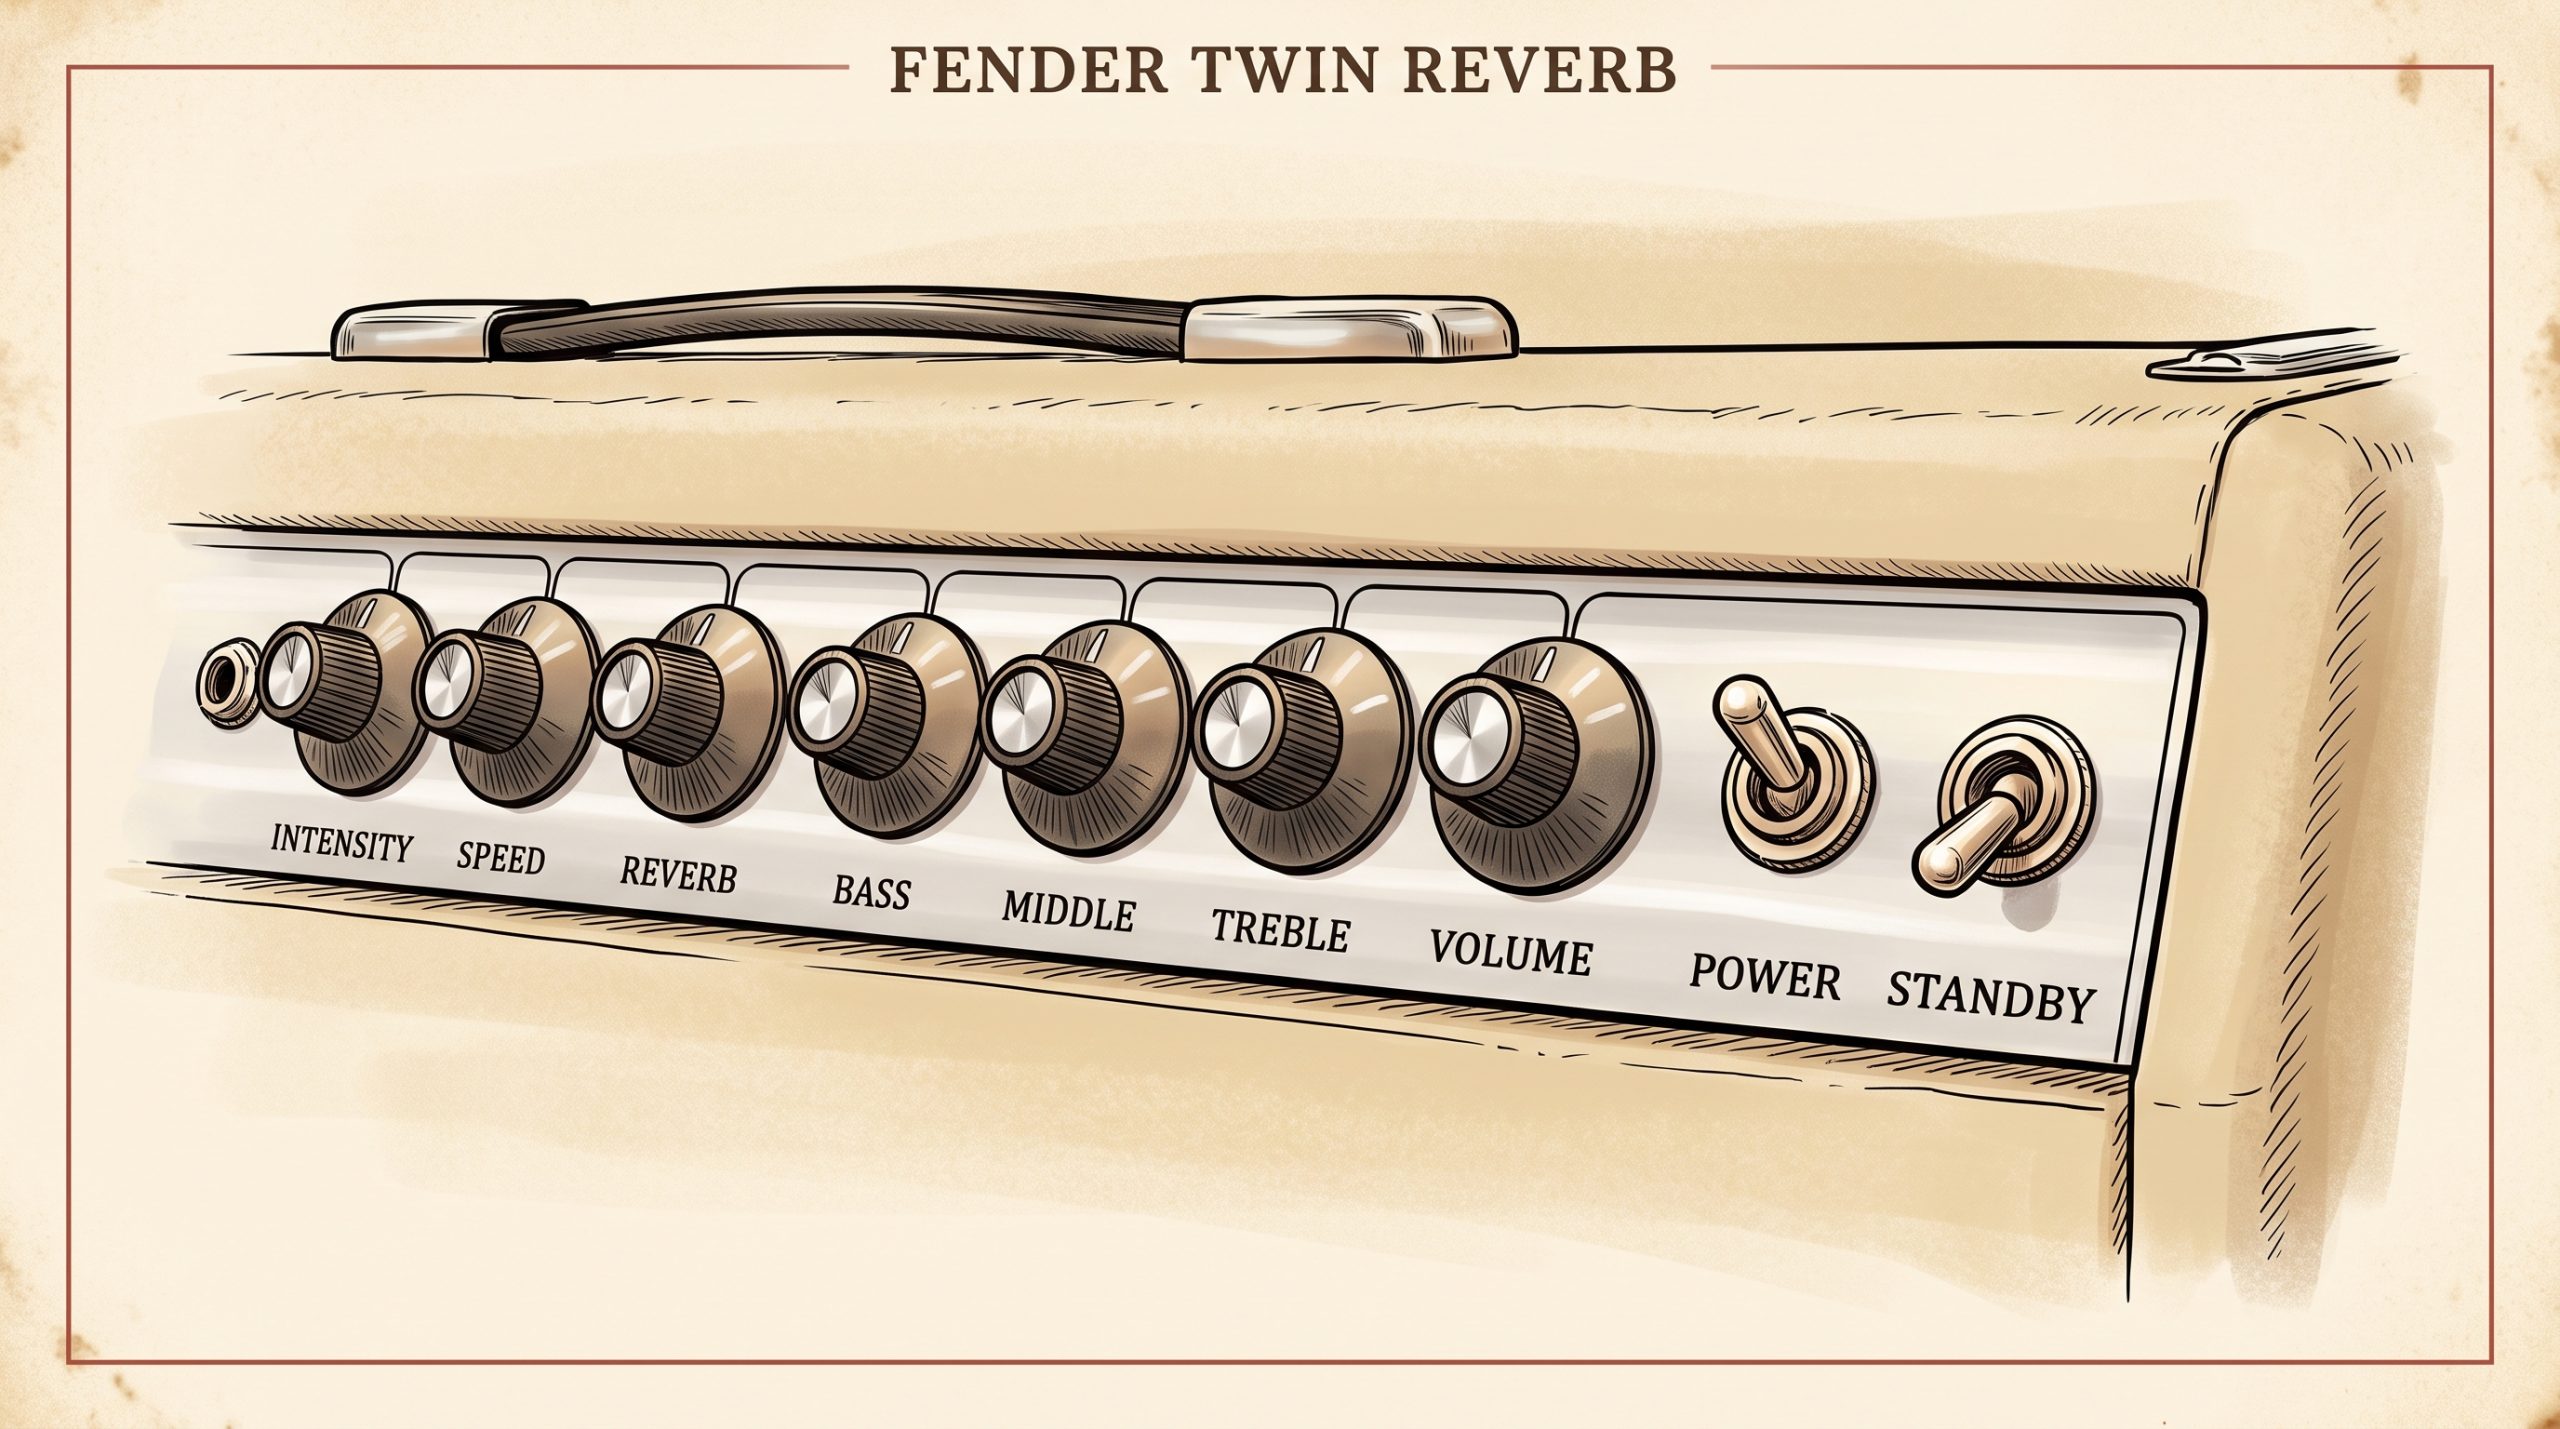
Why Turning On a Tube Amp Is Different From Any Other Gear
Tubes Need Heat Before They Need Voltage
Vacuum tubes operate on thermionic emission: the cathode must be heated to roughly 1,000°F before it releases electrons efficiently. That heat comes from the heater filament, a separate circuit inside the tube that runs on 6.3VAC (for most power tubes) or 12.6VAC (for most dual-triode preamp tubes). Until the cathode reaches operating temperature, the tube simply can’t do its job. More critically, if high-voltage DC hits a cold cathode, the oxide coating on the cathode surface takes the brunt of it.
This is why old tube radios needed time to warm up before producing sound. It’s why the ENIAC computer, built in 1946 with 17,468 vacuum tubes, required careful power sequencing to avoid failures. Guitar amps are no different. A solid-state amplifier (transistors, op-amps) has no warm-up requirement at all, it’s at full operating spec the moment voltage is applied. Tube amps aren’t solid-state. The physics aren’t comparable, and the startup procedure shouldn’t be either.
What the Standby Switch Actually Does
It’s Not Just a Mute Button
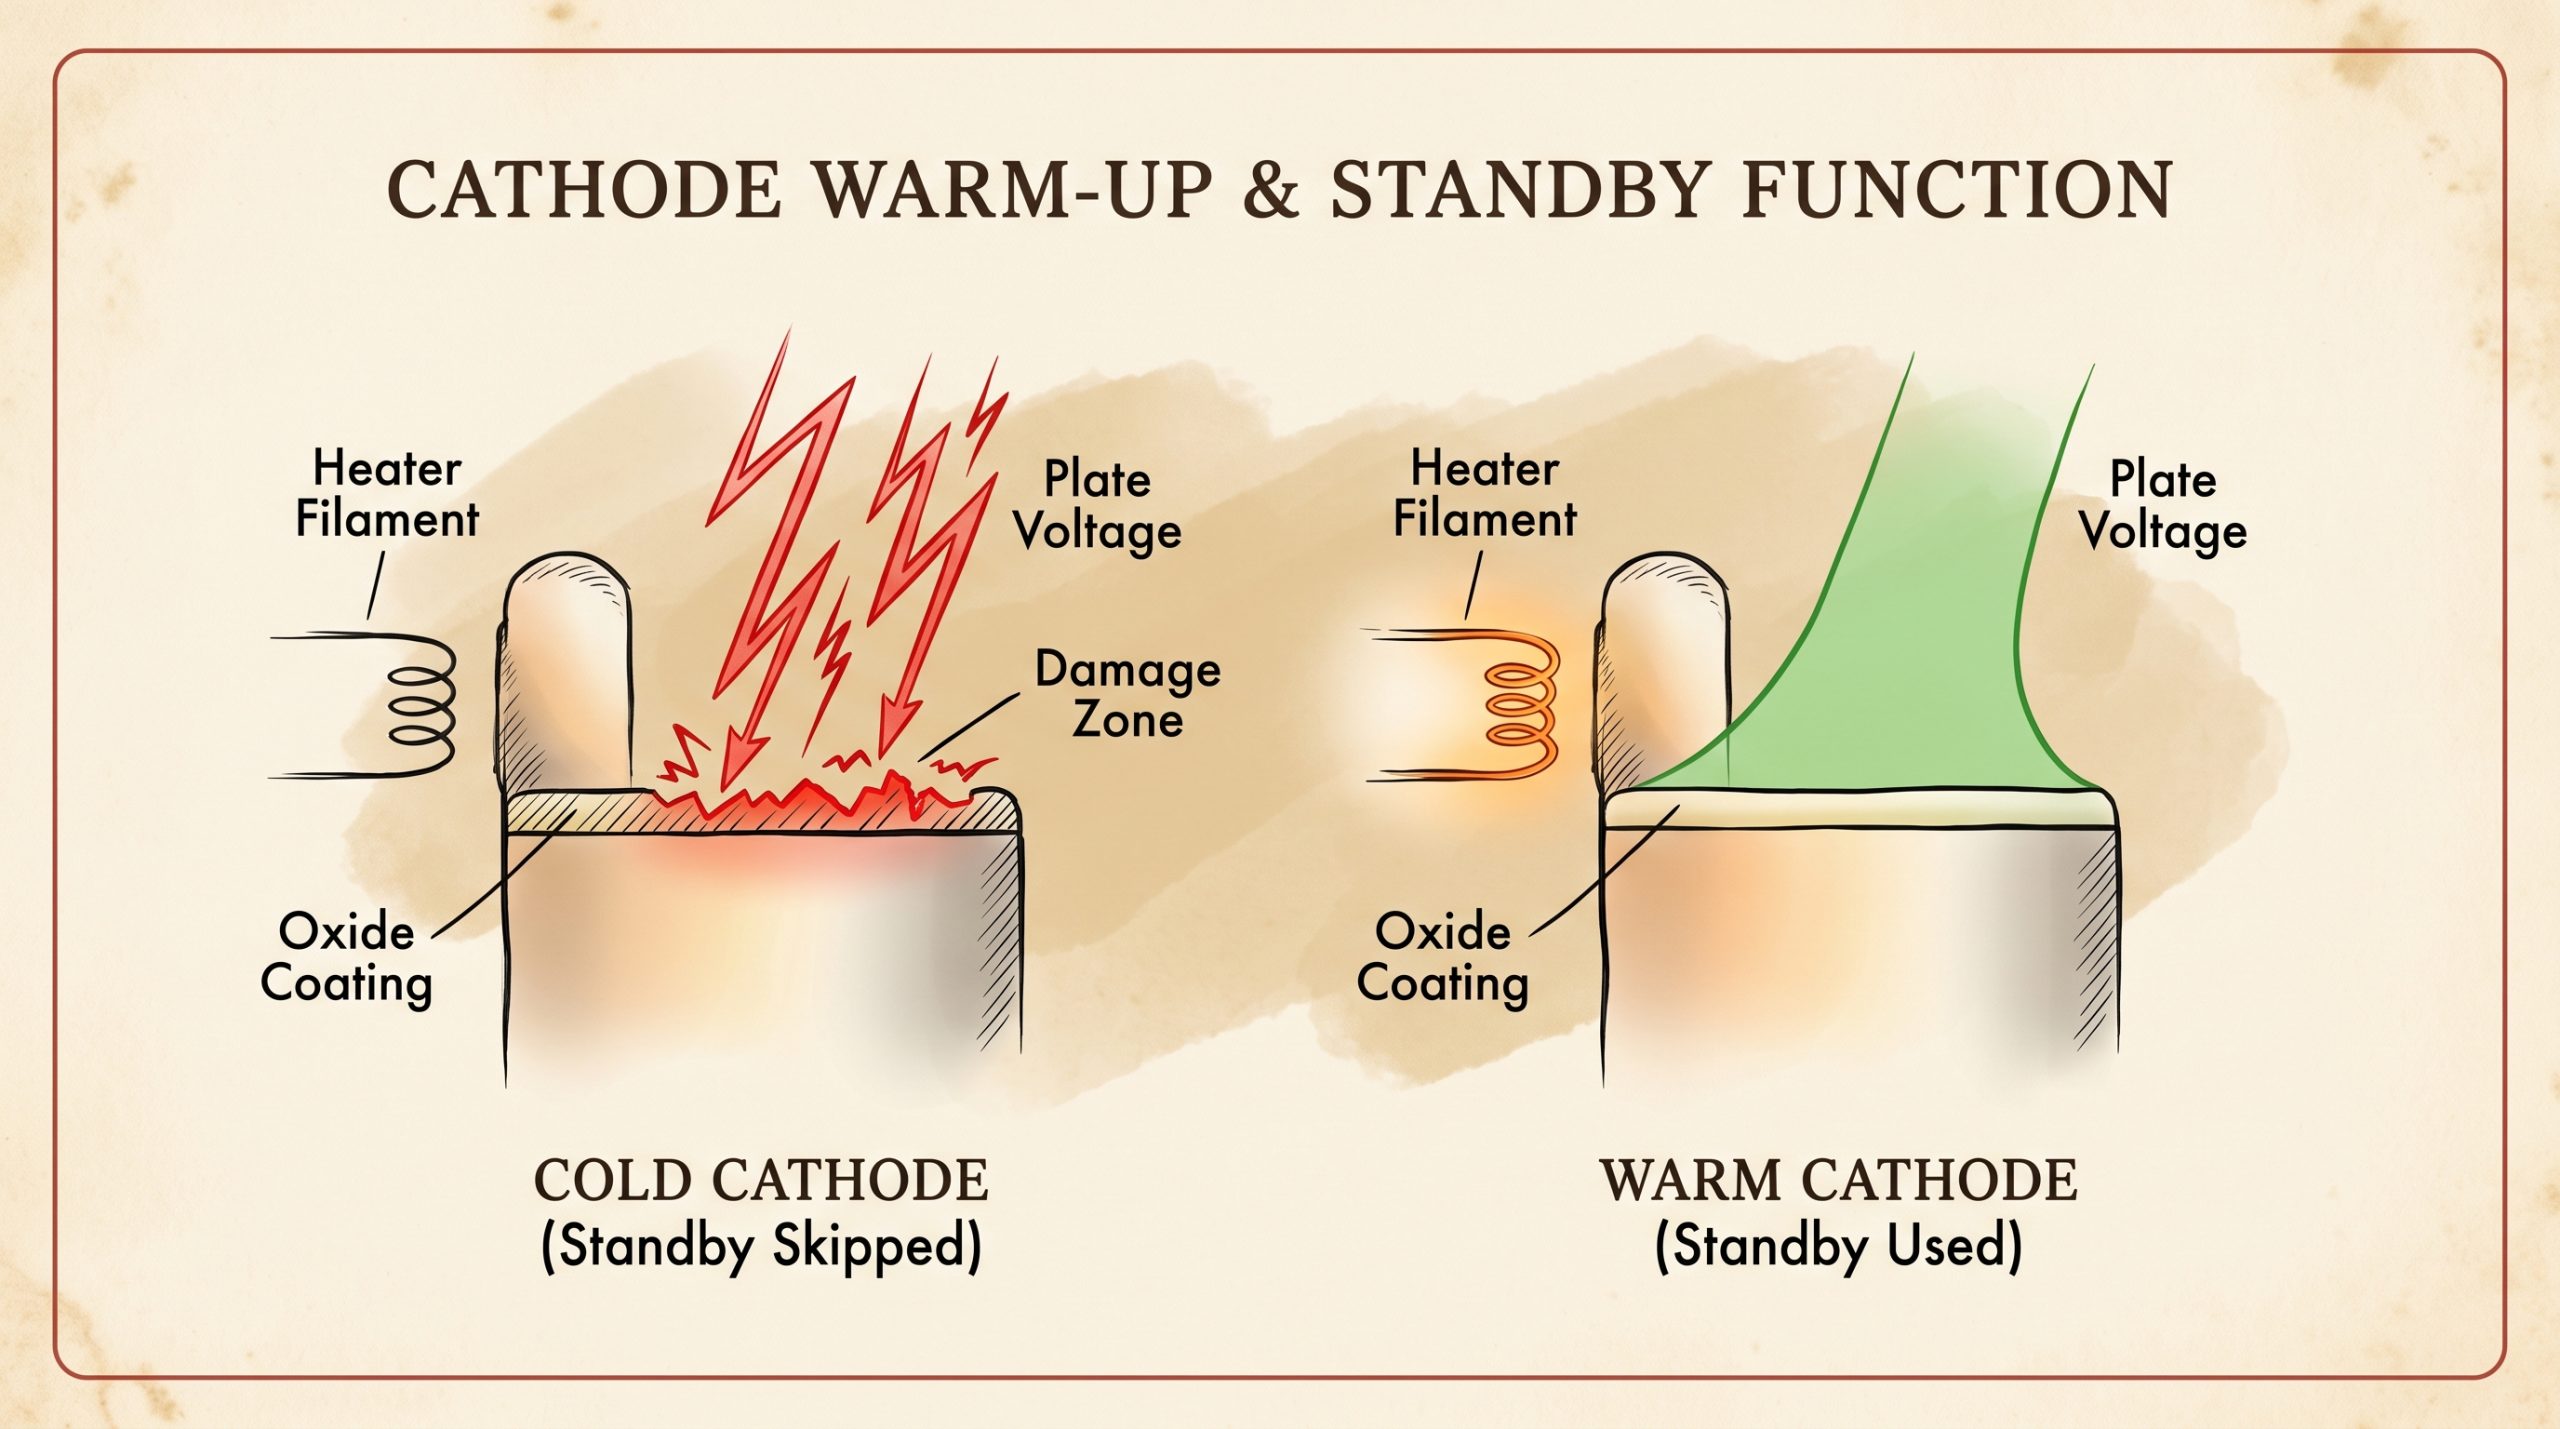
Most players assume standby equals silence. That’s true as a side effect, but it’s not what the switch is doing electrically. The standby switch is a high-voltage gate. It interrupts the B+ supply, the high-voltage DC rail that feeds the plates and screens of the power tubes. What it does not interrupt is the heater circuit. The filaments stay energized the entire time the power switch is on. Tubes are warming up while the amp sits in standby; they just aren’t receiving plate voltage yet.
That distinction matters. Standby isn’t muting the signal. It’s holding back the high-voltage supply until the tubes are thermally ready to handle it.
Cathode Poisoning: What You’re Actually Preventing
The damage mechanism has a name: cathode poisoning. When high plate voltage is applied to a cold cathode, the oxide coating on the cathode surface, a carefully deposited layer of barium and strontium oxides in most modern tubes, absorbs the energy unevenly. The coating can be partially burned off, creating bare spots that emit electrons erratically or not at all. Not great. Once the oxide layer is stripped, the tube runs hotter to produce the same output, gain drops, and lifespan shortens dramatically. That damage is not recoverable without replacing the tube.
The cathode coating on a typical 6L6GC or EL34 power tube reaches stable emission at approximately 30 to 60 seconds of heater-only operation at rated filament voltage. The 30-to-60-second window isn’t arbitrary. It reflects the actual thermal inertia of the cathode structure. Push B+ voltage through before that window closes and you’re shortening tube life in ways that don’t show up immediately but accumulate over time.
Tubes rated for 2,000 to 5,000 hours under correct operating conditions can fail at 500 to 1,000 hours with chronic cold starts. That’s not a minor efficiency difference. That’s a significant cost difference in a set of matched 6L6GCs or EL34s, especially if you’re chasing NOS glass.
What Happens Inside the Amp During Standby
The sequence runs like this: power switch to “On” energizes the heater circuit, and tubes begin warming. The standby switch in the standby position blocks B+ voltage from reaching the power tube plates and screens. When the warm-up window closes and standby switches to “play,” B+ voltage, typically 420 to 480VDC in a blackface Fender Twin Reverb and approximately 420VDC in a blackface Deluxe Reverb (AB763 circuit), arrives at fully warmed cathodes that are ready to handle it. The difference between those two scenarios is the entire point of the standby switch.
For a useful reference on identifying which circuit code and era your amp belongs to, the Fender tube amp serial number and dating guide covers chassis stamps, transformer codes, and tube chart data across all production eras.
Step-by-Step: How to Turn On a Tube Amp Correctly
The Standard Power-On Sequence
- Set all volume and gain controls to zero before touching either switch. This prevents loud pops through the speaker when voltage is applied to the circuit.
- Set the standby switch to “Standby” (not play or on) before flipping the power switch. Confirm it’s in standby before proceeding.
- Flip the power switch to “On.” the heater circuit energizes immediately. You’ll see tubes begin to glow orange or amber within 5 to 10 seconds of power-on.
- Wait 30 to 60 seconds minimum. This is the standard warm-up window. In cold environments (below 50°F / 10°C) or after extended storage, extend that to a full 2 minutes. Tubes that have been sitting cold in a warehouse for months need the longer window.
- Flip standby to “Play” or “On.” B+ voltage now reaches fully warmed tubes. No cold cathode exposure.
- Bring volume up gradually. Listen for unusual hum, crackling, or motorboating before driving the amp at full volume. Any of those sounds warrant a closer look before a gig.
Does Your Amp Even Have a Standby Switch?
Not every tube amp includes a standby switch. Many budget combo amps omit it, as do a number of vintage tweed-era Fenders from 1948 to 1960. Early tweed models commonly used tube rectifiers, the 5Y3GT in lower-power models like the Champ, and the GZ34/5AR4 in higher-power models, which naturally slow the rise of B+ voltage. A tube rectifier takes 10 to 20 seconds to reach full rectification, acting as a partial built-in soft-start. It’s not a complete substitute for a standby switch, but it significantly reduces the cold-cathode risk compared to a solid-state rectifier.
If your amp has no standby switch: power on, wait a full 60 seconds, and start playing at low volume. Don’t reach for the volume knob immediately. Let the tubes settle.
Tube Rectifier vs. Solid-State Rectifier: Does It Change the Startup Procedure?
How a Tube Rectifier Changes the Equation
| Rectifier Type | Common Tubes / Components | B+ Rise Time | Standby Switch Needed? | Example Fender Models |
|---|---|---|---|---|
| Tube Rectifier | 5Y3GT, 5AR4/GZ34, 5U4GB | 10 to 25 seconds (gradual) | Less critical, still recommended | 5E3 Tweed Deluxe, blackface Princeton Reverb (AA1164), Deluxe Reverb (AB763), blackface/early-silverface Super Reverb (AB763, 5U4GB) |
| Solid-State Rectifier | Silicon diode bridge | Near-instant (under 1 second) | Critical, must use standby | Silverface Twin Reverb (1968-1981, later circuit revisions) |
| Hybrid | Diode bridge plus tube filter stage | 5 to 10 seconds | Recommended | Some transitional silverface models (1968 to 1970) |
The 5Y3 rectifier tube common in tweed-era Fenders like the Champ and Harvard introduces a natural B+ lag that silicon diodes simply don’t replicate. That gradual voltage rise gives cathodes slightly more time before full plate voltage arrives, which is one reason tweed-era amps survived decades of hard use without standby switches. It’s not a free pass to skip warm-up, but the physics are more forgiving than what you get from a diode bridge.
Why Solid-State Rectified Amps Need the Standby More
Silicon diodes apply full B+ voltage in milliseconds. In a silverface Fender Twin Reverb (produced 1968 to 1981 across several circuit revisions, including AC568 and AA769), that means approximately 480VDC arrives at the 6L6GC power tube plates almost the instant the power switch is flipped. Cold tubes, 480 volts, less than one second. That’s a meaningful stress event on cathode oxide coatings, and it happens every single time you skip the standby warm-up sequence. Silverface-era Fender amps that transitioned to solid-state rectifiers made the standby switch more important, not less, even as some players assumed it was just a holdover from the tweed era. It wasn’t then, and it isn’t now.
Fender’s own technical documentation, available via the Fender support articles archive, confirms that the standby switch’s primary function is tube protection rather than muting during breaks.
How to Turn Off a Tube Amp Correctly
The Correct Power-Down Sequence
- Reduce volume to zero.
- Flip standby switch back to “Standby.” this removes B+ voltage from the power tubes before anything else changes.
- Wait 30 seconds. Residual charge on the filter capacitors begins to bleed down through the bleeder resistors in the circuit.
- Flip power switch to “Off.” heaters de-energize, tubes begin cooling.
- Allow 5 to 10 minutes before covering or storing the amp. Power tubes retain significant heat. Covering a hot amp traps that heat against the chassis and components.
Why the Order Matters on Power-Down
Turning the power switch off while the standby is still in the play position causes the filter capacitors to discharge abruptly through the output transformer windings and into the speaker. That audible thud on shutdown isn’t just annoying. It’s a discharge transient. Repeated over hundreds of on/off cycles, that stress accumulates in output transformer windings and speaker voice coils. Standby-first on shutdown protects three things simultaneously: the power tubes, the output transformer, and the speaker cone. The additional five seconds it takes is not optional maintenance. It’s the correct procedure.
How Long Can You Leave a Tube Amp on Standby?
Between sets or short breaks up to 30 minutes, standby is completely appropriate. The B+ supply is held off the power tubes, so cathode damage from high voltage isn’t the concern. What does run continuously in standby is the heater circuit. A matched quad of 6L6GC tubes draws approximately 3.6 amps at 6.3VAC across the heater supply, which works out to roughly 22.7 watts of continuous heat with no music being produced. That heater-only operation isn’t neutral. It still contributes to slow cathode wear and accelerates socket contact oxidation over time. For breaks exceeding 30 to 45 minutes, powering down fully is better for tube longevity than leaving the heaters on indefinitely.
Vintage Fender Amp-Specific Startup Notes
Blackface Era Fenders (1963 to 1967)
The major blackface circuits, AB763 (Deluxe Reverb, Super Reverb, Pro Reverb), AA763, AB868, and AA864, represent the production peak of the Fender tube amp lineup. Most blackface models shipped with either a GZ34/5AR4 or a 5AR4 tube rectifier, providing a moderate soft-start to B+ voltage. Standby switches were standard on most blackface models, and the recommended startup sequence applies. The tube rectifier makes the warm-up slightly more forgiving than a solid-state circuit, but 30 to 60 seconds in standby remains the correct procedure. Don’t skip it on the assumption that the GZ34 handles everything. It helps. It doesn’t replace the standby window.
Silverface Era Fenders (1968 to 1981)
Silverface production covers circuits AA769, AA270, AA371, and several others depending on model and year. Many silverface models transitioned to solid-state rectification during this period, particularly higher-power models. The standby switch is non-negotiable on these amps. Some later silverface Twin Reverb variants ran B+ voltages up to approximately 500VDC, applying that to cold 6L6GC tubes without standby warm-up is a reliable way to shorten tube life and increase service costs. If you’re buying or restoring a silverface-era amp, confirming whether the rectifier is tube or solid-state is one of the first identification steps. The field method for dating a Fender amp covers chassis stamps and tube chart codes that help identify the exact circuit variant.
Tweed Era Fenders (1948 to 1960)
Tweed-era Fenders are the exception to many standard rules. Many of these amps lack a standby switch entirely. The tweed Fender amp era guide covers the full production context, but from a startup standpoint: low-power tweed models like the Champ and Harvard used 5Y3GT rectifiers that provide a gradual B+ ramp. The 5E3 Tweed Deluxe used a 5Y3GT as well. Power on, wait 45 to 60 seconds, and start at low volume. The absence of a standby switch on a tweed Fender isn’t an oversight. It reflects a design context where the tube rectifier itself provided enough of a soft-start to protect the power tubes under normal use.
Common Tube Amp Startup Mistakes and What They Actually Do to Your Amp
Mistake 1: Flipping Standby to Play Before Tubes Warm Up
The risk is cathode poisoning, described above. It doesn’t produce a dramatic failure event. The tube keeps working. But gain drops incrementally, the tube runs hotter than spec, and what should be a 3,000-hour output tube fails at 800 hours. Tubes are not cheap, particularly matched pairs or quads of quality 6L6GC or EL84 glass. Chronic cold starts are the most common cause of premature power tube failure outside of actual circuit faults. Tube manufacturer datasheets for power tubes like the EL84 and 6L6GC specify rated heater voltage and current, and the standby warm-up window exists precisely to let that heater spec do its job before plate voltage arrives.
Mistake 2: Turning Power Off Without Going to Standby First
That audible thud on shutdown is a filter capacitor discharge transient hitting the output transformer and speaker simultaneously. Once or twice, it’s inconsequential. Over years of use, repeated transients stress output transformer primary windings and can contribute to speaker voice coil displacement. Output transformers on a blackface Deluxe Reverb are not cheap to replace. Standby-first costs five seconds. Not doing it costs more.
Mistake 3: Cranking Volume Immediately After Standby-to-Play Flip
Even properly warmed tubes benefit from 2 to 3 minutes of low-volume operation before being driven hard. Output tubes at full power generate substantial heat beyond heater-only operation. A gradual ramp-up allows thermal equilibrium to stabilize before peak current draw hits the cathodes and plates. This is particularly relevant if the amp has been in a cold vehicle or storage space before the gig.
Mistake 4: Leaving the Amp in Standby for Hours
Common at multi-set gigs: amp left in standby between sets for two or more hours. The heaters run the entire time, generating heat, accelerating socket contact oxidation, and slowly contributing to cathode wear without any music coming out of the speaker. Power down fully if the break exceeds 30 to 45 minutes. Powering down and doing the correct startup sequence again takes under two minutes. It’s better than running heaters for two hours at ~22.7 watts of waste heat.
Quick-Reference Startup Checklist
Keep this sequence in mind every time the amp comes out of the case.
Before You Play:
- Volume and gain controls at zero
- Standby switch confirmed in “Standby” position
- Power switch to “On”, confirm tubes begin to glow within 10 seconds
- Wait 30 to 60 seconds minimum (2 minutes in cold environments or after storage)
- Flip standby to “Play”
- Bring volume up gradually and listen before cranking
Before You Pack Up:
- Volume to zero
- Standby switch to “Standby”
- Wait 30 seconds
- Power switch to “Off”
- Allow 5 to 10 minutes to cool before covering or transporting
The sequence adds less than two minutes to your setup and teardown. Tube replacement on a set of matched 6L6GCs adds significantly more time and cost. If you’re also troubleshooting an amp that powers on but produces no sound after startup, the Fender amp no-sound diagnostic guide covers the most common causes from cold tubes to failed cables and beyond. Start there before pulling the chassis.
Frequently asked questions
How do I turn a tube amp on and off?
Power-on sequence: set standby to "Standby," flip power to "On," wait 30 to 60 seconds, then flip standby to "Play." Power-off sequence: reduce volume to zero, flip standby back to "Standby," wait 30 seconds, then flip power to "Off." Use standby as the buffer in both directions, every time.
Should I put my tube amp in standby before turning it off?
Yes. Flipping to standby before cutting power removes B+ voltage from the power tubes before the heaters shut down. This prevents the filter capacitor discharge transient that causes the audible "thud" on abrupt shutdown and reduces long-term stress on the output transformer windings and speaker. The sequence takes seconds and has measurable protective value over the life of the amp.
How long should I let a tube amp warm up before playing?
A minimum of 30 to 60 seconds in standby is the standard recommendation for most tube amps. In cold environments (below 50°F / 10°C) or after extended storage, extend warm-up to a full 2 minutes. Solid-state rectified amps, those without a tube rectifier, require the full warm-up window more critically than tube-rectified models because there's no natural B+ soft-start in the circuit.
Is it bad to turn a tube amp on and off repeatedly?
Moderate power cycling, multiple times per day, isn't inherently harmful if the correct startup sequence is followed each time. The damage mechanism is cold-start B+ application, not the act of switching power on and off. An amp powered on and off five times correctly is in better shape than an amp powered on once incorrectly and left to run all day.
How long can you leave a tube amp on standby?
A reasonable limit is 30 minutes for set breaks. Beyond that, powering down fully is better for tube longevity. Heaters running in standby still generate heat and contribute to slow cathode wear over time, even without B+ applied. An indefinite standby, leaving the amp in standby overnight or for hours, wastes power and adds unnecessary hours to heater life without any benefit. Power down fully.