Contents
- 01⚠ Safety Warning Before You Start
- 02What Is Tube Amp Bias? (The Short Version That Actually Makes Sense)
- 03Tools You Need to Bias a Tube Amp
- 04How to Bias a Tube Amp with a Multimeter (Step-by-Step)
- 056V6 vs. 6L6 Bias Targets in Fender Amps: Why They're Different
- 06Fender-Specific Bias Reference Chart by Circuit Number
- 07How to Spot Bias Drift Without a Multimeter
- 08Do 12AX7 Preamp Tubes Need to Be Biased?
- 09Frequently Asked Questions
- 10What to Do If You're Not Sure
Most players assume biasing is a dark art requiring an electronics degree. It isn’t. But there’s a persistent myth in the other direction too: that you can drop in a fresh set of matched 6V6s or 6L6s and just play. In a fixed-bias Fender, that approach will run your new tubes too hot, too cold, or both, depending on where the trimmer landed last time.
Here’s what actually matters for Fender owners specifically: the blackface and silverface fixed-bias circuits (AB763, AA1164, AA864, and their silverface descendants) all require a bias check whenever output tubes are changed. The cathode-biased tweed circuits, like the 5E3 Deluxe and the 5F1 Champ, generally don’t. Knowing which type you have before reaching for a screwdriver is step one.
The other thing worth stating clearly up front: the voltages inside a powered tube amp are genuinely dangerous. Fender blackface B+ rails typically run 420–480V DC. Capacitors hold that charge for minutes to hours after power-off. The safety section below isn’t boilerplate. Read it.
- Fixed-bias Fenders (AB763, AA1164, AA864): require bias adjustment when changing output tubes
- Cathode-biased Fenders (5F1 Champ, 5E3 Deluxe, Blues Junior): self-biasing, no trimmer to adjust
- Target plate dissipation: 70–80% of rated tube maximum (Class AB fixed bias)
- 6V6GT max plate dissipation: 14W (GE/RCA spec), 15W (modern JJ/Tung-Sol)
- 6L6GC max plate dissipation: 30W
- B+ voltages in Fender blackface/silverface amps: 420–480V DC, lethal; filter caps retain charge after power-off
- Professional bias service cost: $40–$80, not including tubes, cheap insurance on a vintage amp
- Generic bias target tables are unreliable: target current depends on your actual measured B+ voltage, not a fixed mA number
- 12AX7 preamp tubes do NOT need biasing, they are cathode-biased via fixed resistors
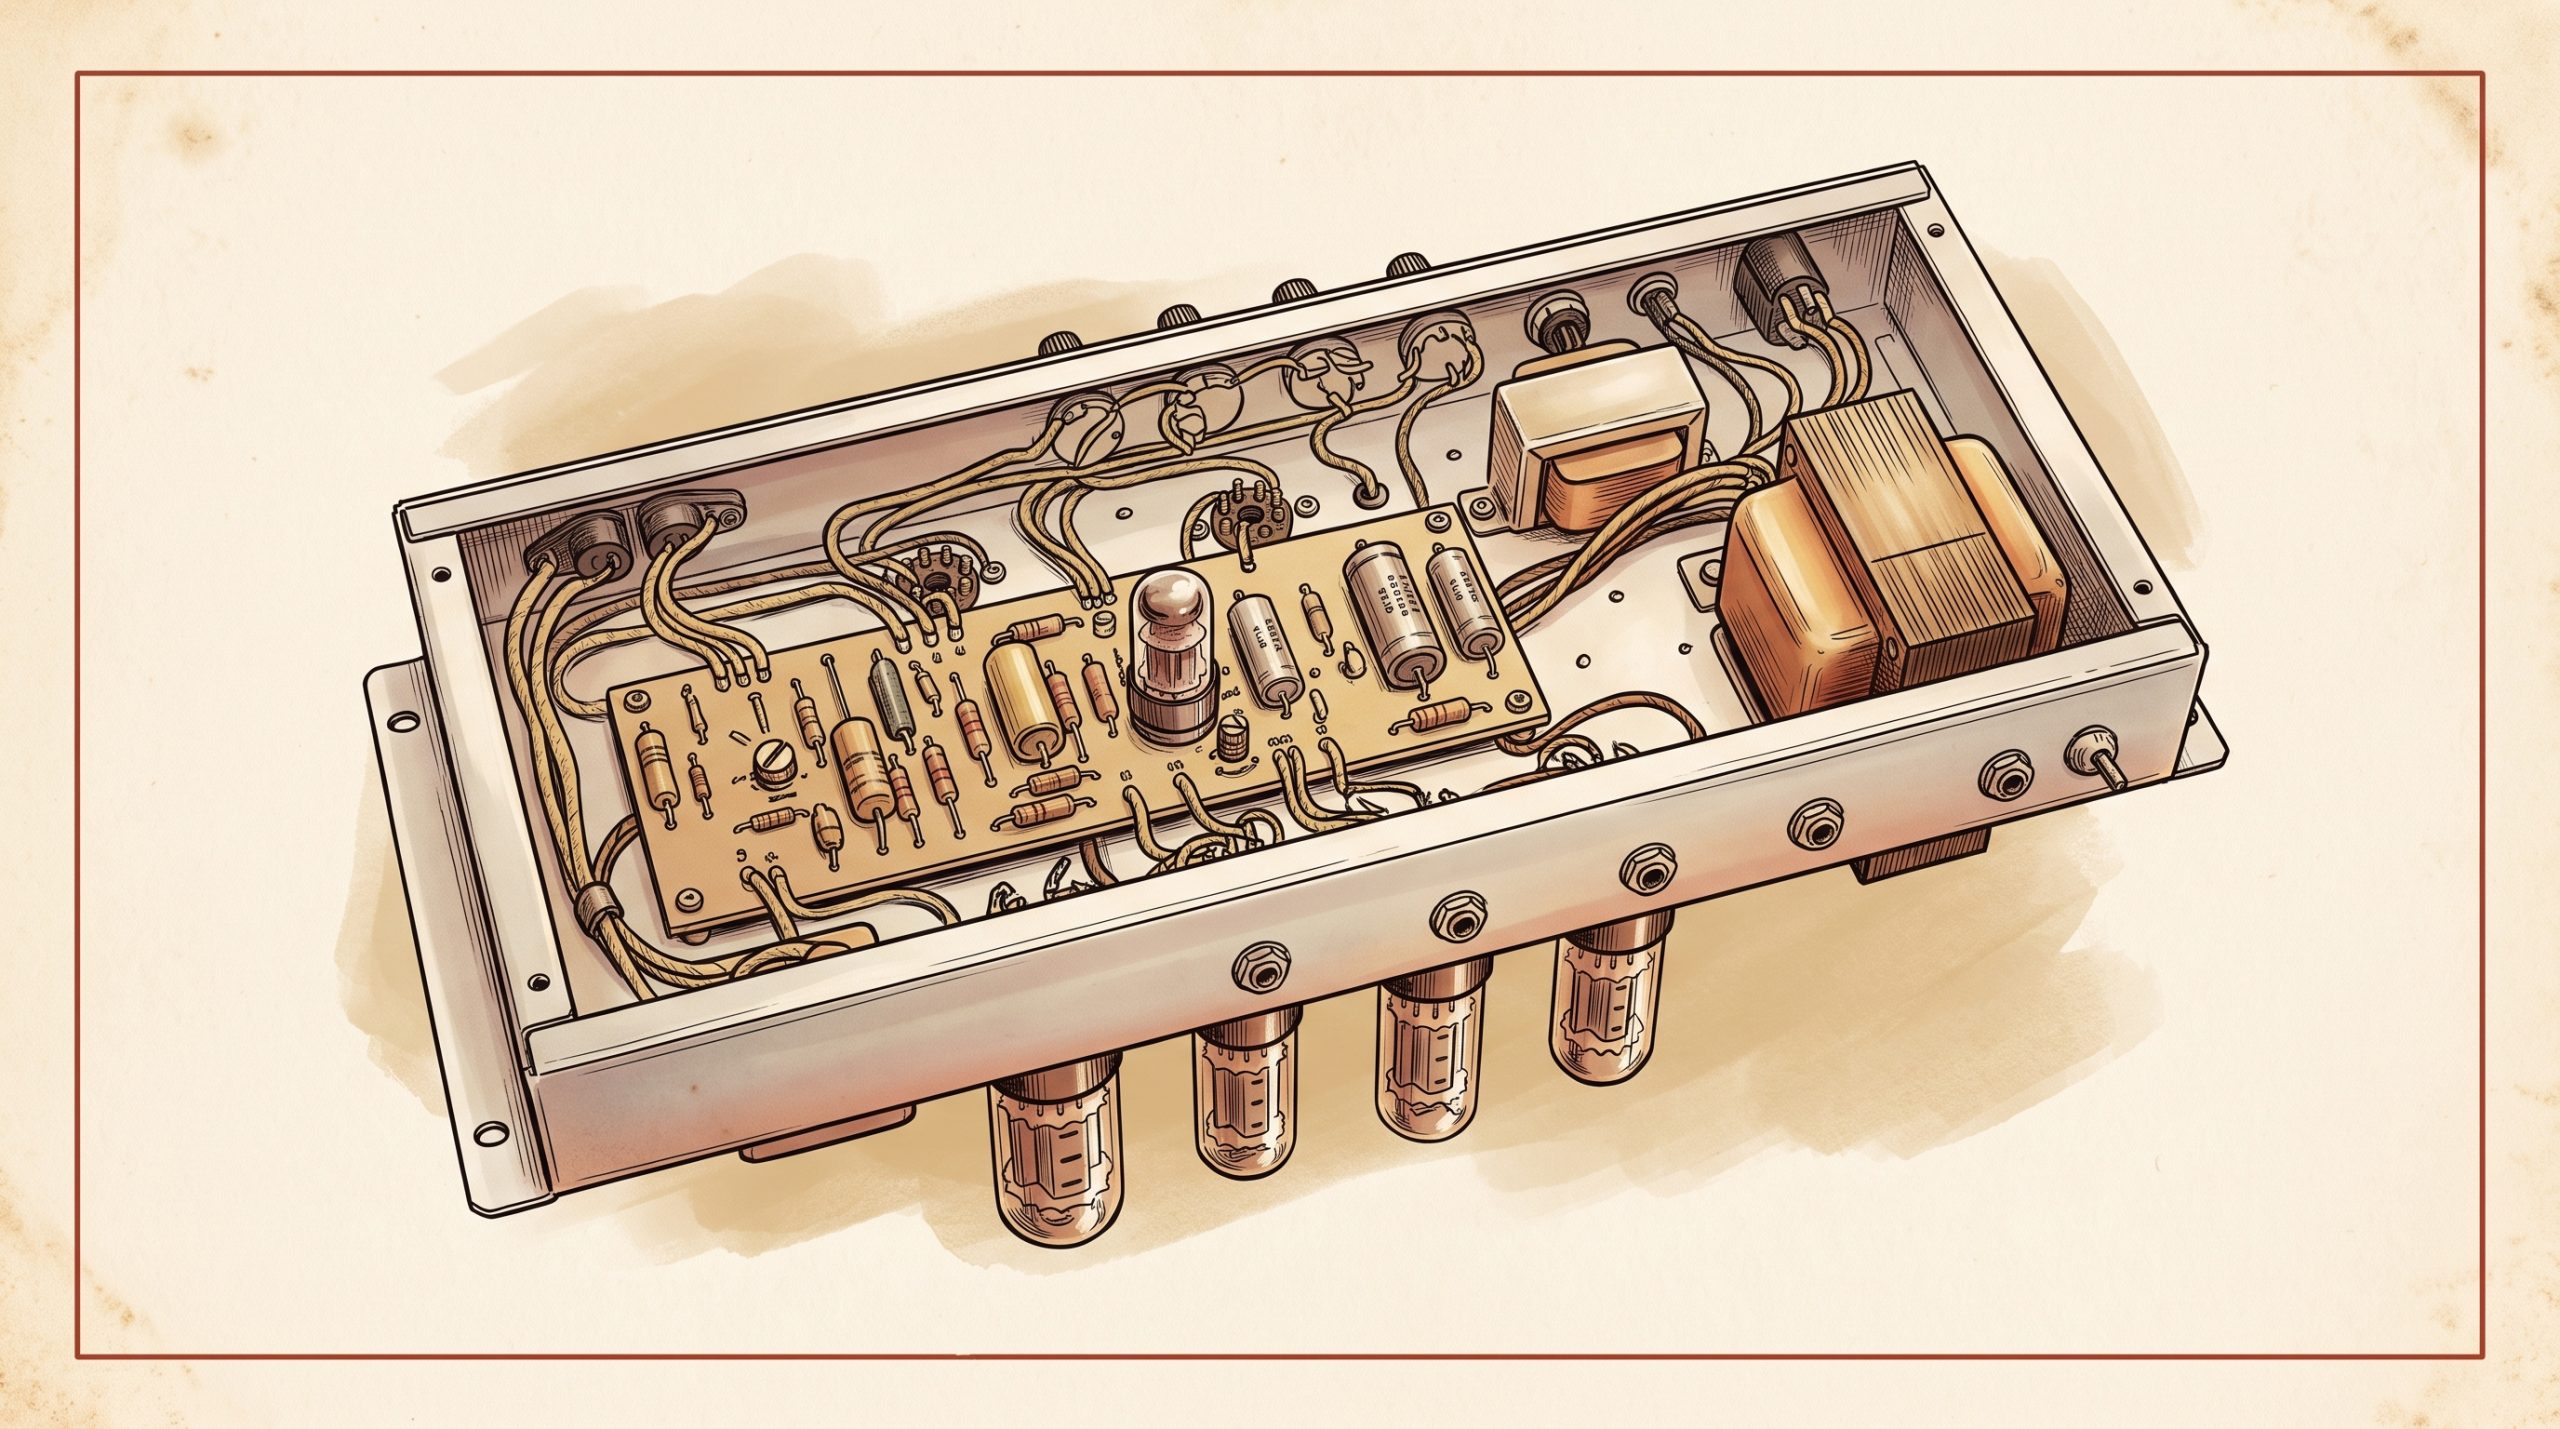
⚠ Safety Warning Before You Start
High-Voltage Hazards in Tube Amplifiers
The B+ supply rail in a Fender blackface or silverface amp typically sits between 420V and 480V DC under operating conditions. That is not a figure to skim past. For reference, household current at 120V AC can kill. The DC voltages inside a tube amp are nearly four times that, and they don’t disappear the moment you flip the power switch.
Filter capacitors store charge. In a typical Fender blackface power supply, the main filter caps can hold dangerous voltage for anywhere from several minutes to well over an hour after power-off, depending on the condition of the bleeder resistors. Never assume a disconnected amp is a safe amp.
Basic rules for working on a live chassis:
- Keep one hand behind your back or in a pocket when probing live circuits. A shock path that runs hand-to-hand crosses your heart. A shock path from hand to thigh is survivable; the other route often isn’t.
- Never work on a tube amp chassis sitting on a metal surface. Use a rubber mat or wooden workbench.
- Safety glasses. Glass envelopes fail under stress, and they fail fast.
- If you’re not comfortable with high-voltage DC, stop here. A bias service from a qualified amp tech runs $40–$80. That’s cheap compared to the cost of a vintage output transformer, which may no longer be in production.
Know Your Amp Type Before You Touch Anything
Not every Fender needs a bias adjustment after a tube swap. The two categories:
- Fixed bias (adjustable): A separate bias supply circuit provides negative DC voltage to the output tube grids. A trimmer pot on the circuit board controls the operating point. This covers the majority of blackface and silverface Fenders, including the Deluxe Reverb (AB763), Twin Reverb (AB763), Super Reverb (AB763), and Bassman (AA864/AB165). These require bias adjustment every time output tubes are changed.
- Cathode bias (self-biasing): A resistor in the cathode circuit automatically sets the operating point regardless of tube variation. This covers the tweed 5F1 Champ, tweed 5E3 Deluxe, and the Blues Junior. No trimmer pot, no adjustment needed.
Quick identification: if your Fender has a small trimmer pot accessible through the rear panel or visible on the main board near the output tube sockets, it’s fixed bias. If there’s no trimmer anywhere near the output section, it’s almost certainly cathode-biased.
What Is Tube Amp Bias? (The Short Version That Actually Makes Sense)
The Physics in Plain Language
Bias, in the context of a power tube, is the DC operating point that determines how many electrons flow from cathode to plate with no audio signal present. That idle electron flow is your bias current. The heat generated at the plate by that idle current is your plate dissipation, measured in watts.
Think of it like a car engine at idle. Too low and it stalls, too high and it’s burning fuel with the car in park. For a power tube, “too hot” means the plate glows red and the tube fails prematurely. “Too cold” means crossover distortion, the harsh, gritty, transistor-like character that appears when each tube stops conducting briefly at the zero-crossing of the audio waveform.
Plate dissipation is calculated as: plate voltage (V) multiplied by plate current (A) equals watts of heat at idle. Tube manufacturers publish a maximum plate dissipation figure in the tube datasheet. The accepted practice for Class AB fixed-bias amps is to set idle dissipation at 70–80% of that maximum. Rob Robinette’s tube bias reference at robrobinette.com notes that 70% of max dissipation is the standard safe limit for a Class AB fixed bias amp like the 5F6A Bassman.
Fixed Bias vs. Cathode Bias: The Fender Split
Fender’s shift from cathode-biased tweed designs to fixed-bias blackface circuits wasn’t accidental. Fixed bias runs output tubes cooler at a given output wattage and allows higher plate voltages with more headroom before clipping. That combination is exactly what produced the clean, glassy, room-filling sound of the 1963–1967 blackface era.
- Fixed bias amps: Deluxe Reverb (AB763), Twin Reverb (AB763), Super Reverb (AB763), Bassman (AA864/AB165), Princeton Reverb (AA1164)
- Cathode bias amps: Tweed Champ (5F1), Tweed Deluxe (5E3), Vibro Champ (AA764), Blues Junior (PCB cathode resistors)
For a complete breakdown of what changed between the tweed and blackface eras at the circuit level, the Fender 5E3 Tweed Deluxe guide covers the cathode bias architecture in detail.
Tools You Need to Bias a Tube Amp
Minimum Required Tools
- Digital multimeter (DMM): Needs a 200mV DC range for cathode voltage measurement and a 500V or 1000V DC range for plate voltage. Input impedance of 10 megaohms or higher prevents meter loading from skewing readings.
- Small flathead screwdriver: For the bias trimmer pot. Some Fender trimmers are accessed through a hole in the rear panel; others require the chassis to be pulled.
- Dummy load or test speaker: Never run a tube amp without a speaker load. An unloaded output transformer can arc internally and fail. A simple 8-ohm 50W power resistor works.
- Safety glasses.
Optional but Highly Recommended Tools
- Bias probe / bias meter: Plugs between the power tube and its socket. Reads plate current directly in milliamps without requiring any math or live probing of high-voltage points. For 6V6 and 6L6 Fenders, you need an octal (8-pin) probe. Common options include the Tube Amp Doctor Bias Master (TAD), the Weber Bias Rite, and the Amp RX Bias King. TAD’s product page at tubeampdoctor.com shows the Bias Master current specifications.
- Infrared thermometer: For checking glass envelope temperature after adjustment. Normal operating glass temperature runs 150–200°C. Above 250°C, red-plating risk increases sharply. That approach eliminates the need to probe live high-voltage nodes directly, which makes it the lower-risk method for anyone doing this for the first time. (See the full discussion at Premier Guitar’s Ask Amp Man.)
Tool Purpose Budget Option Pro Option Digital Multimeter Measure plate voltage and cathode voltage Klein MM300 (~$30) Fluke 87V (~$180) Bias Probe (octal, 8-pin) Read plate current directly in mA DIY 1Ω resistor socket adapter TAD Bias Master (~$60) Dummy Load Safe speaker substitute during testing 8Ω 50W power resistor Weber MASS load Small Screwdriver Adjust bias trimmer pot Generic flathead Wiha precision set Infrared Thermometer Monitor tube glass temperature Harbor Freight IR gun (~$15) Fluke 62 MAX (~$80) 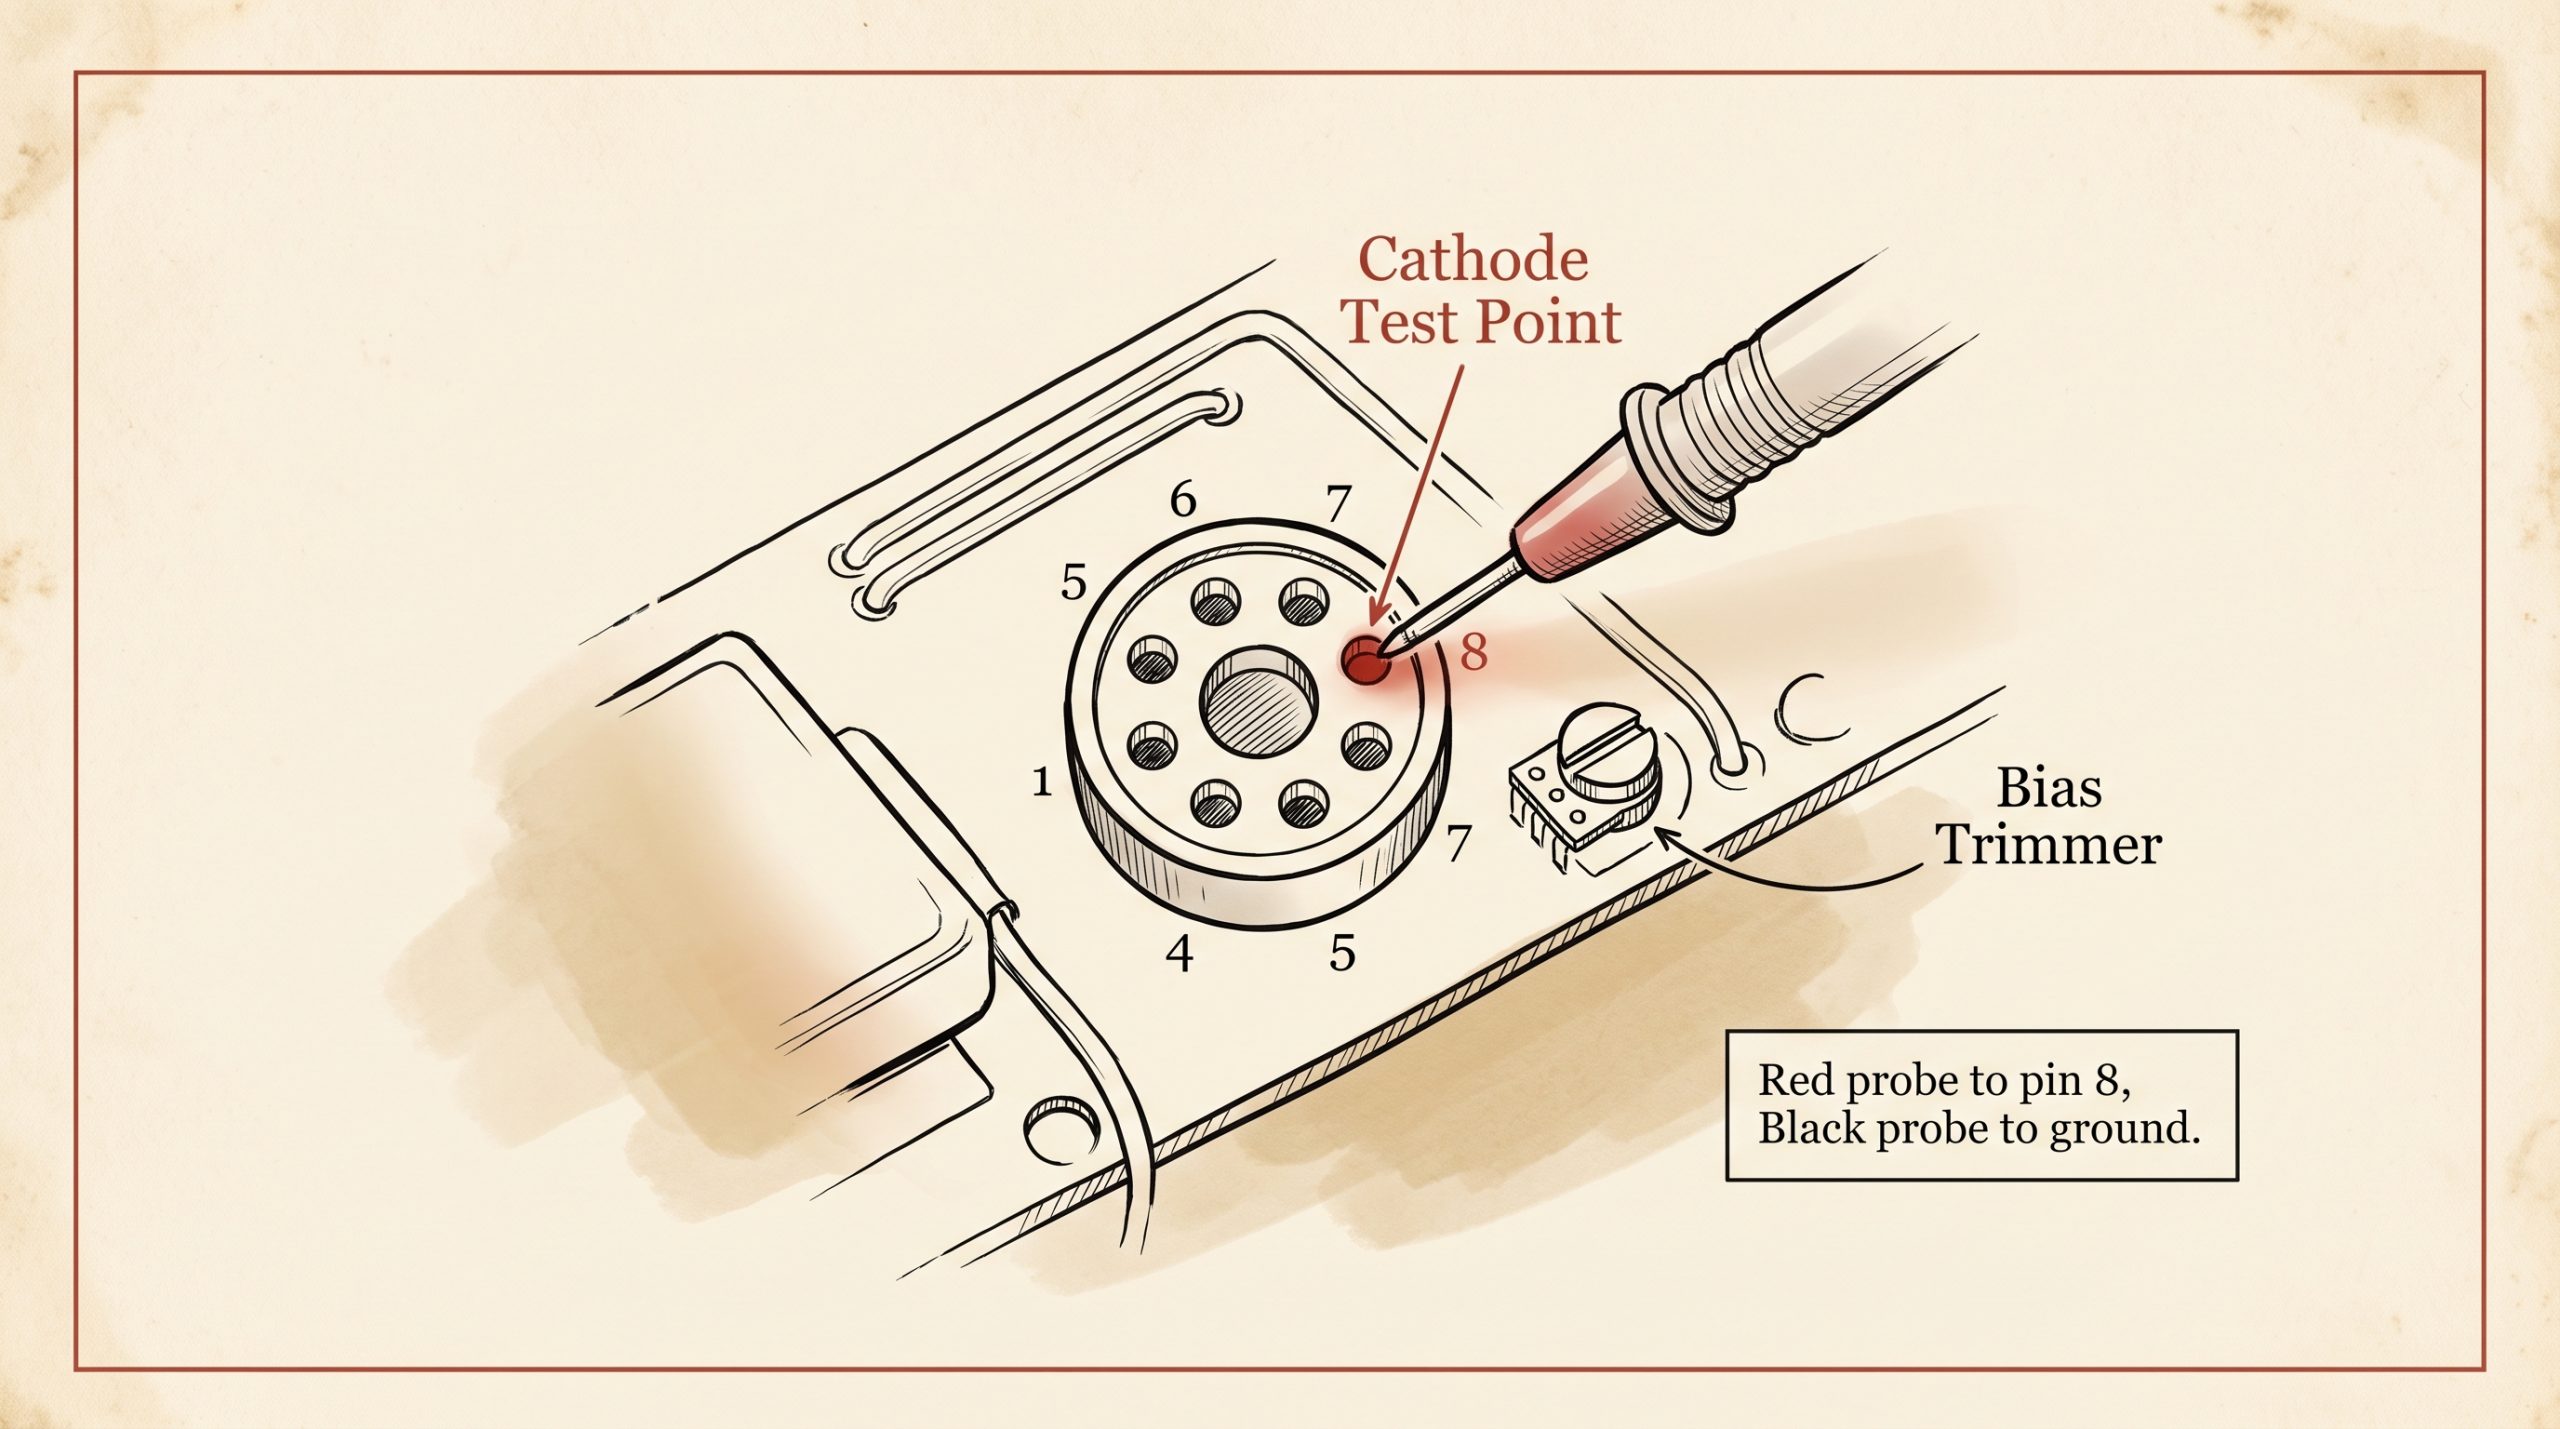
Multimeter probe placement at the cathode test point (pin 8) of a 6V6 output tube socket in an AB763 circuit. How to Bias a Tube Amp with a Multimeter (Step-by-Step)
Step 1: Install New Matched Tubes and Warm Up
Always start with matched power tubes. Matched sets are binned by the tube supplier at a reference plate voltage for similar transconductance and idle current draw. A mismatched pair will pull different current through the output transformer’s primary winding, increasing hum and asymmetric clipping. Not great for tone, and not great for the transformer long-term.
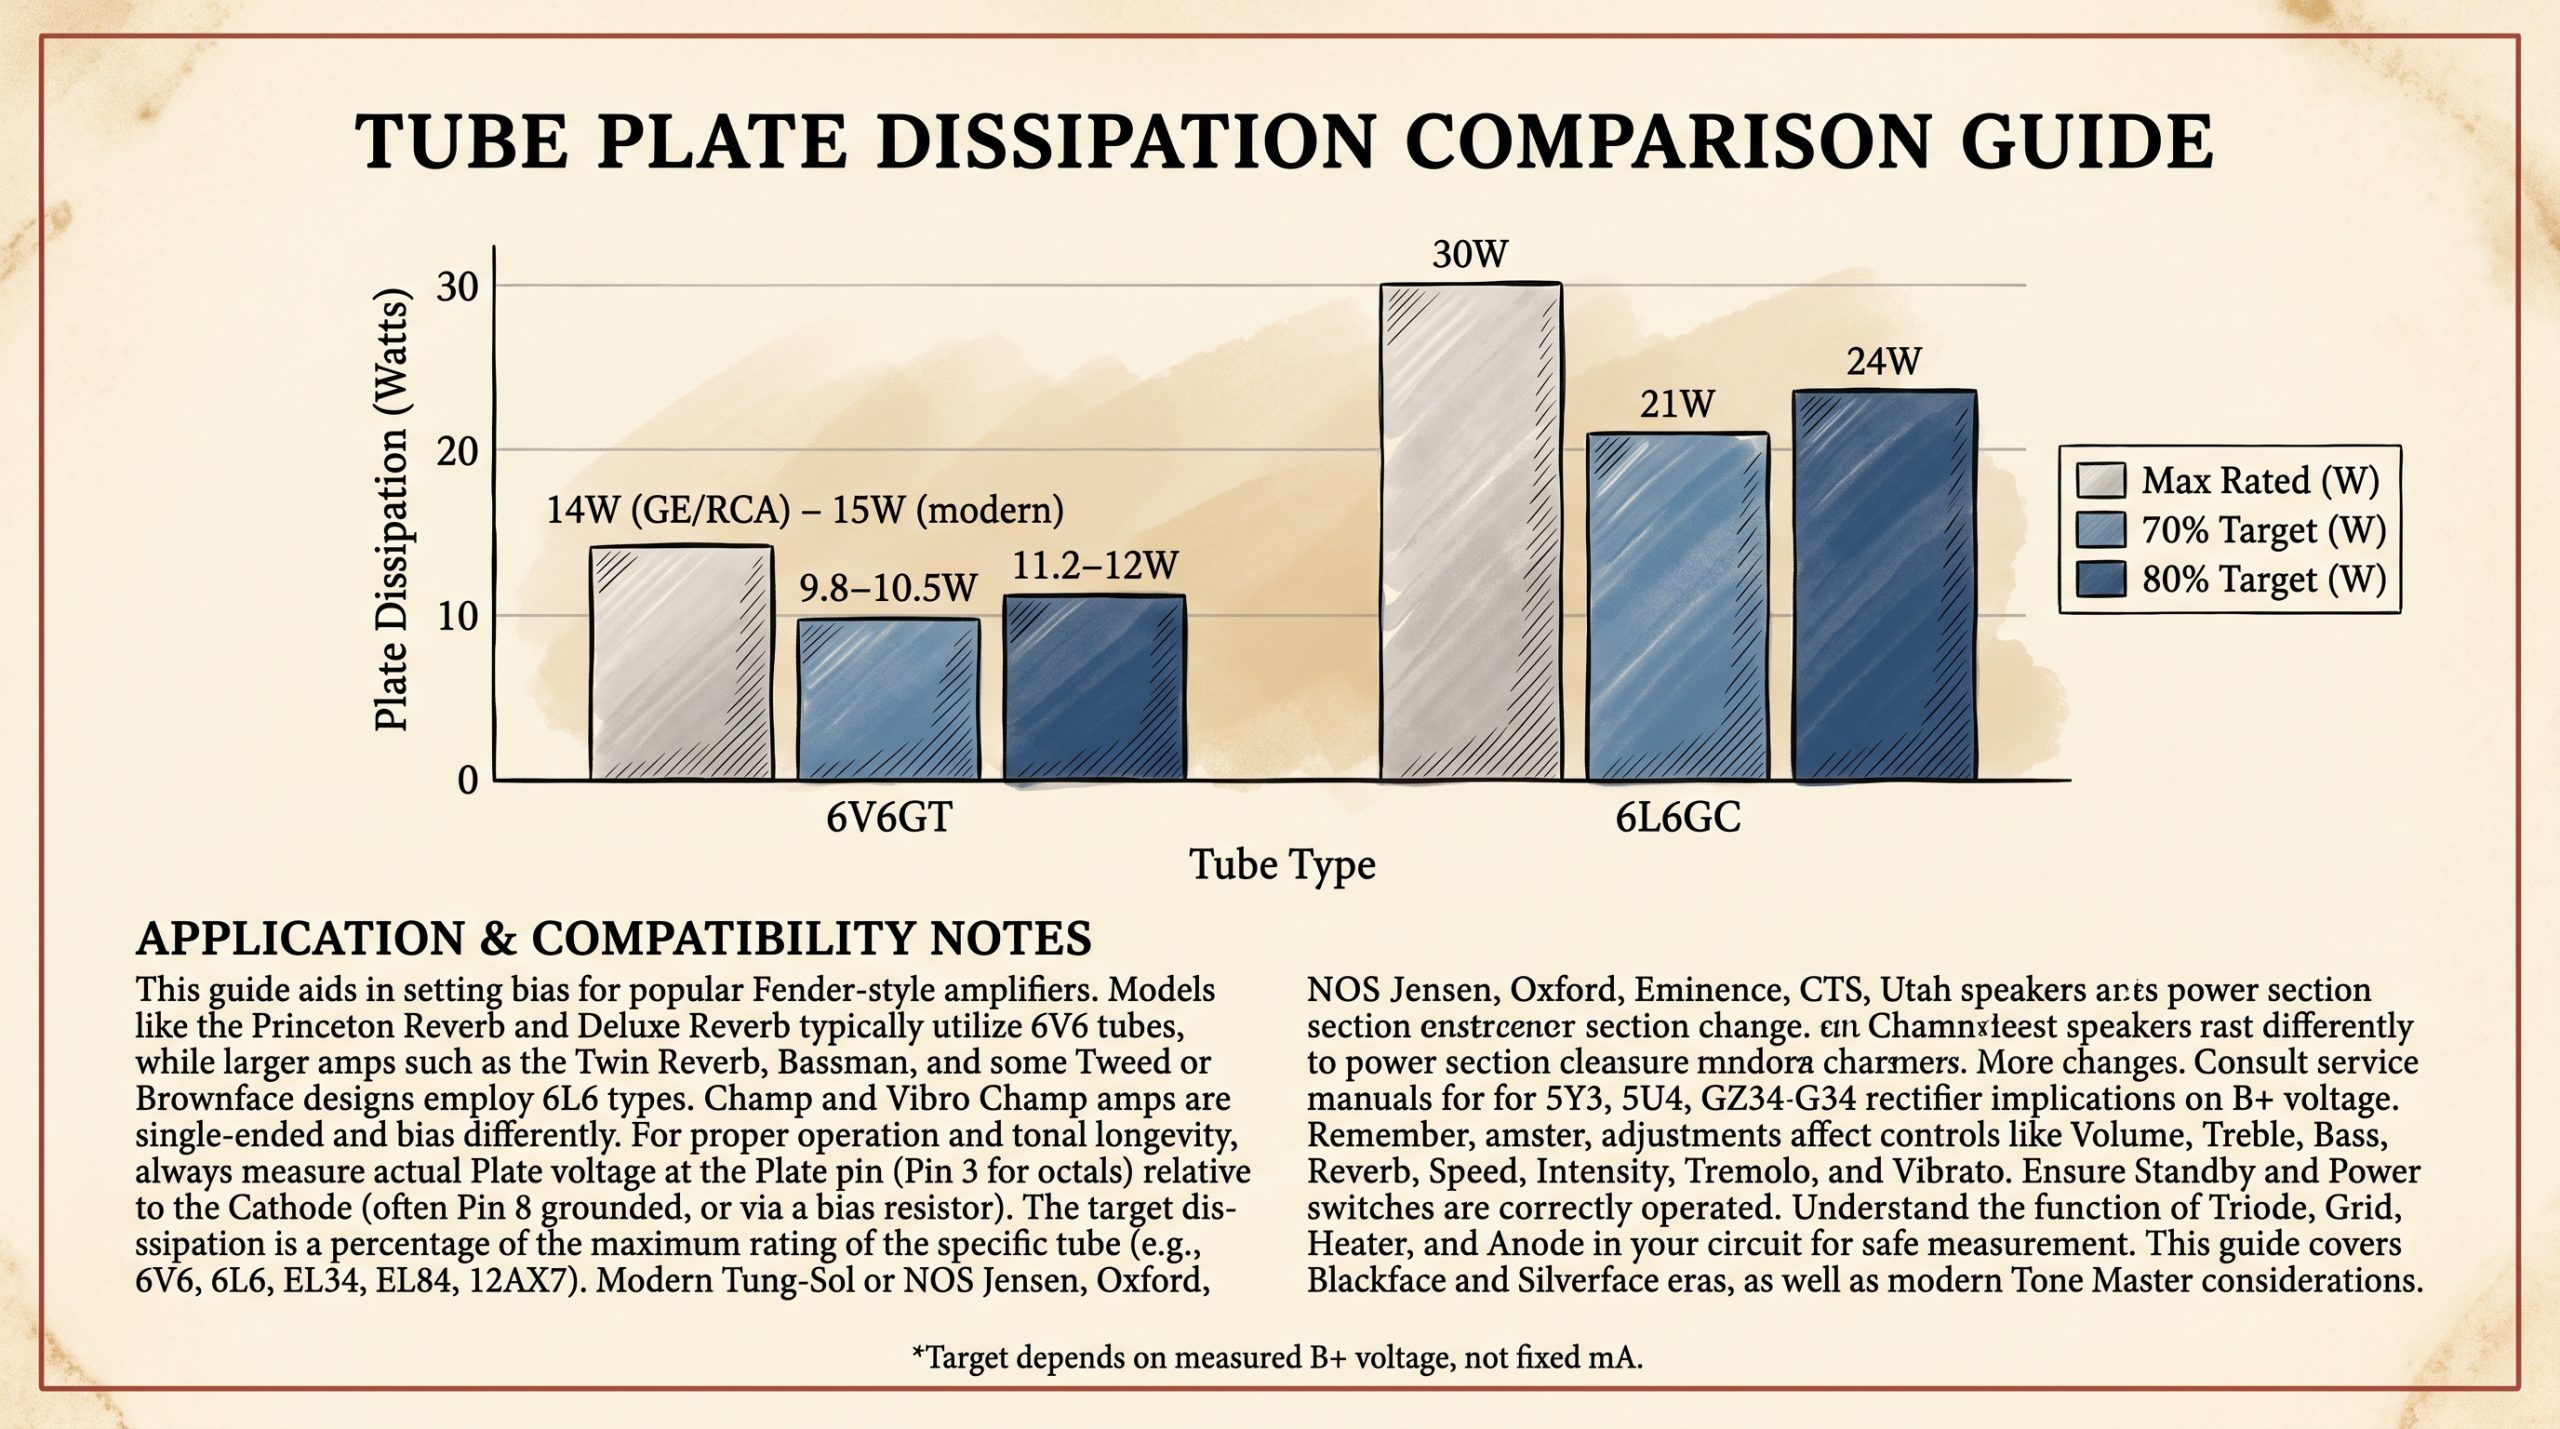
Target plate dissipation ranges for 6V6 and 6L6 output tubes at 70–80% of rated maximum. Once new tubes are installed, power the amp up (with a speaker or dummy load connected), let it sit on standby for two minutes to allow the cathodes to heat properly, then bring it off standby and let it run for a full 15–20 minutes before measuring anything. Fender output stages, particularly the AB763 quad-6L6 configurations in the Twin Reverb, take time to reach thermal equilibrium. Measurements taken before that point will drift after you’ve finished adjusting.
Step 2: Locate the Test Points on Your Fender
Most Fender fixed-bias amps have 1-ohm cathode resistors at the output tube sockets that serve as convenient current-sense points. Specific locations by circuit:
- Deluxe Reverb (AB763, blackface 1963–1967): V7 and V8 are the 6V6GT output sockets. Measure across the 1Ω cathode resistor connected between pin 8 and chassis ground on each socket.
- Princeton Reverb (AA1164, blackface 1964–1967): Same measurement method, but different socket numbers on this 7-tube circuit: V5 and V6 are the output 6V6GT sockets. (V4 is a 12AX7 handling half vibrato duty and half phase inverter duty — not an output tube.)
- Twin Reverb (AB763, blackface 1963–1967): Four 6L6GC sockets. Measure pin 8 cathode voltage on each tube individually.
- Super Reverb (AB763): Two 6L6GC sockets (not four — that’s the Twin Reverb’s count). Same pin 8 cathode-voltage method.
- Bassman (AA864/AB165): Two 6L6GC sockets. Plate voltage at pin 3; cathode current at pin 8 via 1Ω resistor.
If you’re unsure which socket is which on your specific chassis, the Fender Deluxe Reverb complete guide includes a tube layout diagram for the AB763 circuit.
Step 3: Measure Plate Voltage
Set your DMM to DC Volts, 500V or 1000V range. Red probe to pin 3 (plate) of the output tube socket, black probe to chassis ground. Record the reading for each tube. Don’t skip this step and assume a generic number. Actual B+ varies with mains voltage, transformer winding variation, and filter cap condition. Typical readings:
- 6V6 amps (Deluxe Reverb, Princeton Reverb): 430–460V B+
- 6L6 amps (Twin Reverb, Super Reverb, Bassman): 450–480V B+
Step 4: Measure Cathode Current (The Multimeter Method)
Set your DMM to millivolts DC (mVDC). Place probes across the 1-ohm cathode resistor at pin 8. By Ohm’s Law (V = IR), with a 1-ohm resistor, the millivolt reading equals the current in milliamps. A reading of 35mV means 35mA of plate current. Simple. No conversion factor needed as long as the resistor is confirmed to be 1 ohm, which is the Fender factory value on blackface/silverface output stages. The Amplified Parts tech article on biasing at amplifiedparts.com confirms this measurement approach for fixed adjustable-bias amps.
Step 5: Calculate Plate Dissipation
Plate dissipation (Pd) in watts equals plate voltage multiplied by plate current in amps.
Worked example, 6V6GT in a Deluxe Reverb (AB763):
- Measured plate voltage: 445V
- Measured cathode voltage across 1Ω resistor: 35mV = 35mA = 0.035A
- Pd = 445V × 0.035A = 15.6W
- 6V6GT max rated Pd: 14W (GE/RCA datasheet) to 15W (modern JJ/Tung-Sol)
- At 70% of 14W max: target is 9.8W. This tube is running too hot. Trim it down.
Worked example, 6L6GC in a Twin Reverb (AB763):
- Measured plate voltage: 460V
- Measured cathode voltage: 38mV = 38mA = 0.038A
- Pd = 460V × 0.038A = 17.5W
- 6L6GC max rated Pd: 30W
- At 70%: target is 21W. This tube is running under target. Bias it up.
Tube Type Max Plate Dissipation Target at 70% Target at 80% Typical Fender Plate Voltage Target Current Range 6V6GT (original spec) 14W 9.8W 11.2W 430–460V 21–26mA 6V6GT (modern: JJ, Tung-Sol) 15W 10.5W 12W 430–460V 23–28mA 6L6GC 30W 21W 24W 450–480V 44–53mA 5881 (6L6 variant) 23W 16.1W 18.4W 430–460V 35–43mA Step 6: Adjust the Bias Trimmer
The bias trimmer on most blackface/silverface Fenders controls the negative grid voltage supply for both output tubes simultaneously. Turning it clockwise typically increases the negative grid voltage, which decreases plate current and runs the tubes cooler. Counter-clockwise decreases negative grid voltage, increases current, runs hotter. “Typically” is doing real work in that sentence: confirm direction on your specific chassis by making a small adjustment and watching the reading.
Adjust in small increments, roughly 1/8 turn at a time. Wait 30 seconds after each adjustment before re-measuring. Plate voltage can shift slightly as current changes, which means your Pd calculation needs fresh numbers. On matched pairs, target within 2–3mA of each other. If a matched set drifts more than 5mA apart after adjustment, the tubes may not be as well-matched as claimed.
Step 7: Verify, Log, and Reassemble
Once both tubes are within target range, let the amp play at moderate volume for five minutes and watch for red-plating. Red-plating is unmistakable: the metal plate inside the glass envelope glows orange-red. If you see it, cut power immediately and re-check your calculation. Confirm you measured plate voltage correctly and didn’t confuse cathode with screen voltage.
Log everything: date, tube brand and model, measured plate voltage per tube, measured cathode current per tube, calculated Pd, and trimmer position (count turns from full clockwise as a reference). That log becomes invaluable the next time you buy tubes or notice something sounds off.
6V6 vs. 6L6 Bias Targets in Fender Amps: Why They’re Different
The 6V6GT: Fender’s Blackface Workhorse in Small-Power Amps
The 6V6GT shows up in every small blackface Fender: the Deluxe Reverb (AB763), Princeton Reverb (AA1164), and Vibro Champ (AA764). The GE/RCA datasheet rates it at 14W maximum plate dissipation. Some modern production tubes, including the JJ 6V6S and Tung-Sol 6V6GT reissue, carry a 15W rating due to heavier construction, but the conservative approach is to use the 14W figure unless you’ve confirmed the specific tube’s datasheet says otherwise.
Here’s the tolerance problem that makes 6V6 biasing tighter than 6L6 work: at the plate voltages Fender’s blackface circuits operate (430–460V), you’re already near the 6V6GT’s maximum plate voltage rating of 500V. At 445V plate voltage, hitting the 70% Pd target of 9.8W means holding current to roughly 22mA. That’s not much room. A tube running 30mA at 445V is dissipating 13.4W, which is 95% of the original spec maximum. Those tubes wear fast and may red-plate under dynamic peaks.
The 6V6 tube guide covers the differences between original GE/RCA production tubes and current production options in detail, including plate voltage tolerance specs by manufacturer.
The 6L6GC: Fender’s Big-Power Standard
The 6L6GC is the output tube in every large-format blackface Fender: the Twin Reverb (AB763), Super Reverb (AB763), Bassman (AA864/AB165), and Showman (AA763). Its 30W plate dissipation rating gives considerably more headroom compared to the 6V6.
Fender’s factory bias target for the AB763 Twin Reverb puts each 6L6GC at roughly 37–42mA at approximately 460V, which works out to 17–19W. That’s 56–63% of the 30W maximum. Conservative by any measure. The modern school of thought pushes toward 70–75% (21–22.5W) for more touch sensitivity and output power, at the cost of shorter tube life. Worth understanding before you pick a target.
Key data point: a 6L6GC at 460V plate hitting 45mA equals 20.7W plate dissipation, or 69% of maximum. Many players and techs consider that the upper edge of reasonable for a working amp. The 6L6 tube guide covers the full range of 6L6 variants used in Fender amps, including the 5881 (23W rating) and the original 6L6G (19W rating).
Can You Swap 6V6 for 6L6 in a Fender?
Both tubes use the same octal (8-pin) socket. They physically fit each other’s sockets. That’s where the easy compatibility ends. The bias range of the fixed-bias supply circuit, the output transformer’s primary impedance, and the plate voltage headroom all factor into whether the swap is viable without circuit modifications. Not a simple answer. A full explanation is beyond the scope of this article, but the short version is: don’t do it without verifying your bias circuit can reach the required negative grid voltage for the substitute tube at your amp’s actual B+ voltage.
Fender-Specific Bias Reference Chart by Circuit Number
Blackface Era (1963–1967)
The table below uses measured B+ ranges from original production chassis. Your actual B+ may vary; always measure before calculating a target current. The current ranges shown assume 70% Pd target using original-spec tube ratings.
Amp Model Circuit # Era Output Tubes Typical B+ Target Pd (70%) Target Current Range Deluxe Reverb AB763 Blackface 1963–1967 2× 6V6GT 435–455V 9.5–10.5W per tube 21–24mA Princeton Reverb AA1164 Blackface 1964–1967 2× 6V6GT 420–440V 9–10.5W per tube 21–25mA Twin Reverb AB763 Blackface 1963–1967 4× 6L6GC 450–480V 17–21W per tube 38–46mA Super Reverb AB763 Blackface 1963–1967 2× 6L6GC 440–470V 17–20W per tube 38–44mA Bassman AA864 Blackface 1963–1967 2× 6L6GC 445–470V 17–20W per tube 38–44mA Note: the Vibro Champ (AA764) is a single-ended, cathode-biased circuit — it has no bias trimmer and is not included in this fixed-bias reference chart.
Silverface Era (1968–1981)
Many silverface amps used the same core circuits as their blackface predecessors well into the early 1970s. The Deluxe Reverb transitioned from AB763 to AA1270 around 1968; the Twin Reverb moved to AB1270. Both circuit revisions retained the same basic fixed-bias topology, but some silverface amps show slightly higher B+ voltages due to component changes, and several late-silverface models added a master volume circuit that changed the preamp loading and, indirectly, the feel of the output stage.
For silverface amps, the bias targets in the table above remain a reasonable starting point, but confirm with your own measured B+. A silverface Deluxe Reverb with a B+ reading of 465V rather than 445V needs a lower mA target to hold the same 9.5W plate dissipation. For dating your silverface chassis and confirming which circuit revision you have, the Fender tube amp serial number and dating guide covers transformer codes, tube chart date stamps, and chassis stamps by production year.
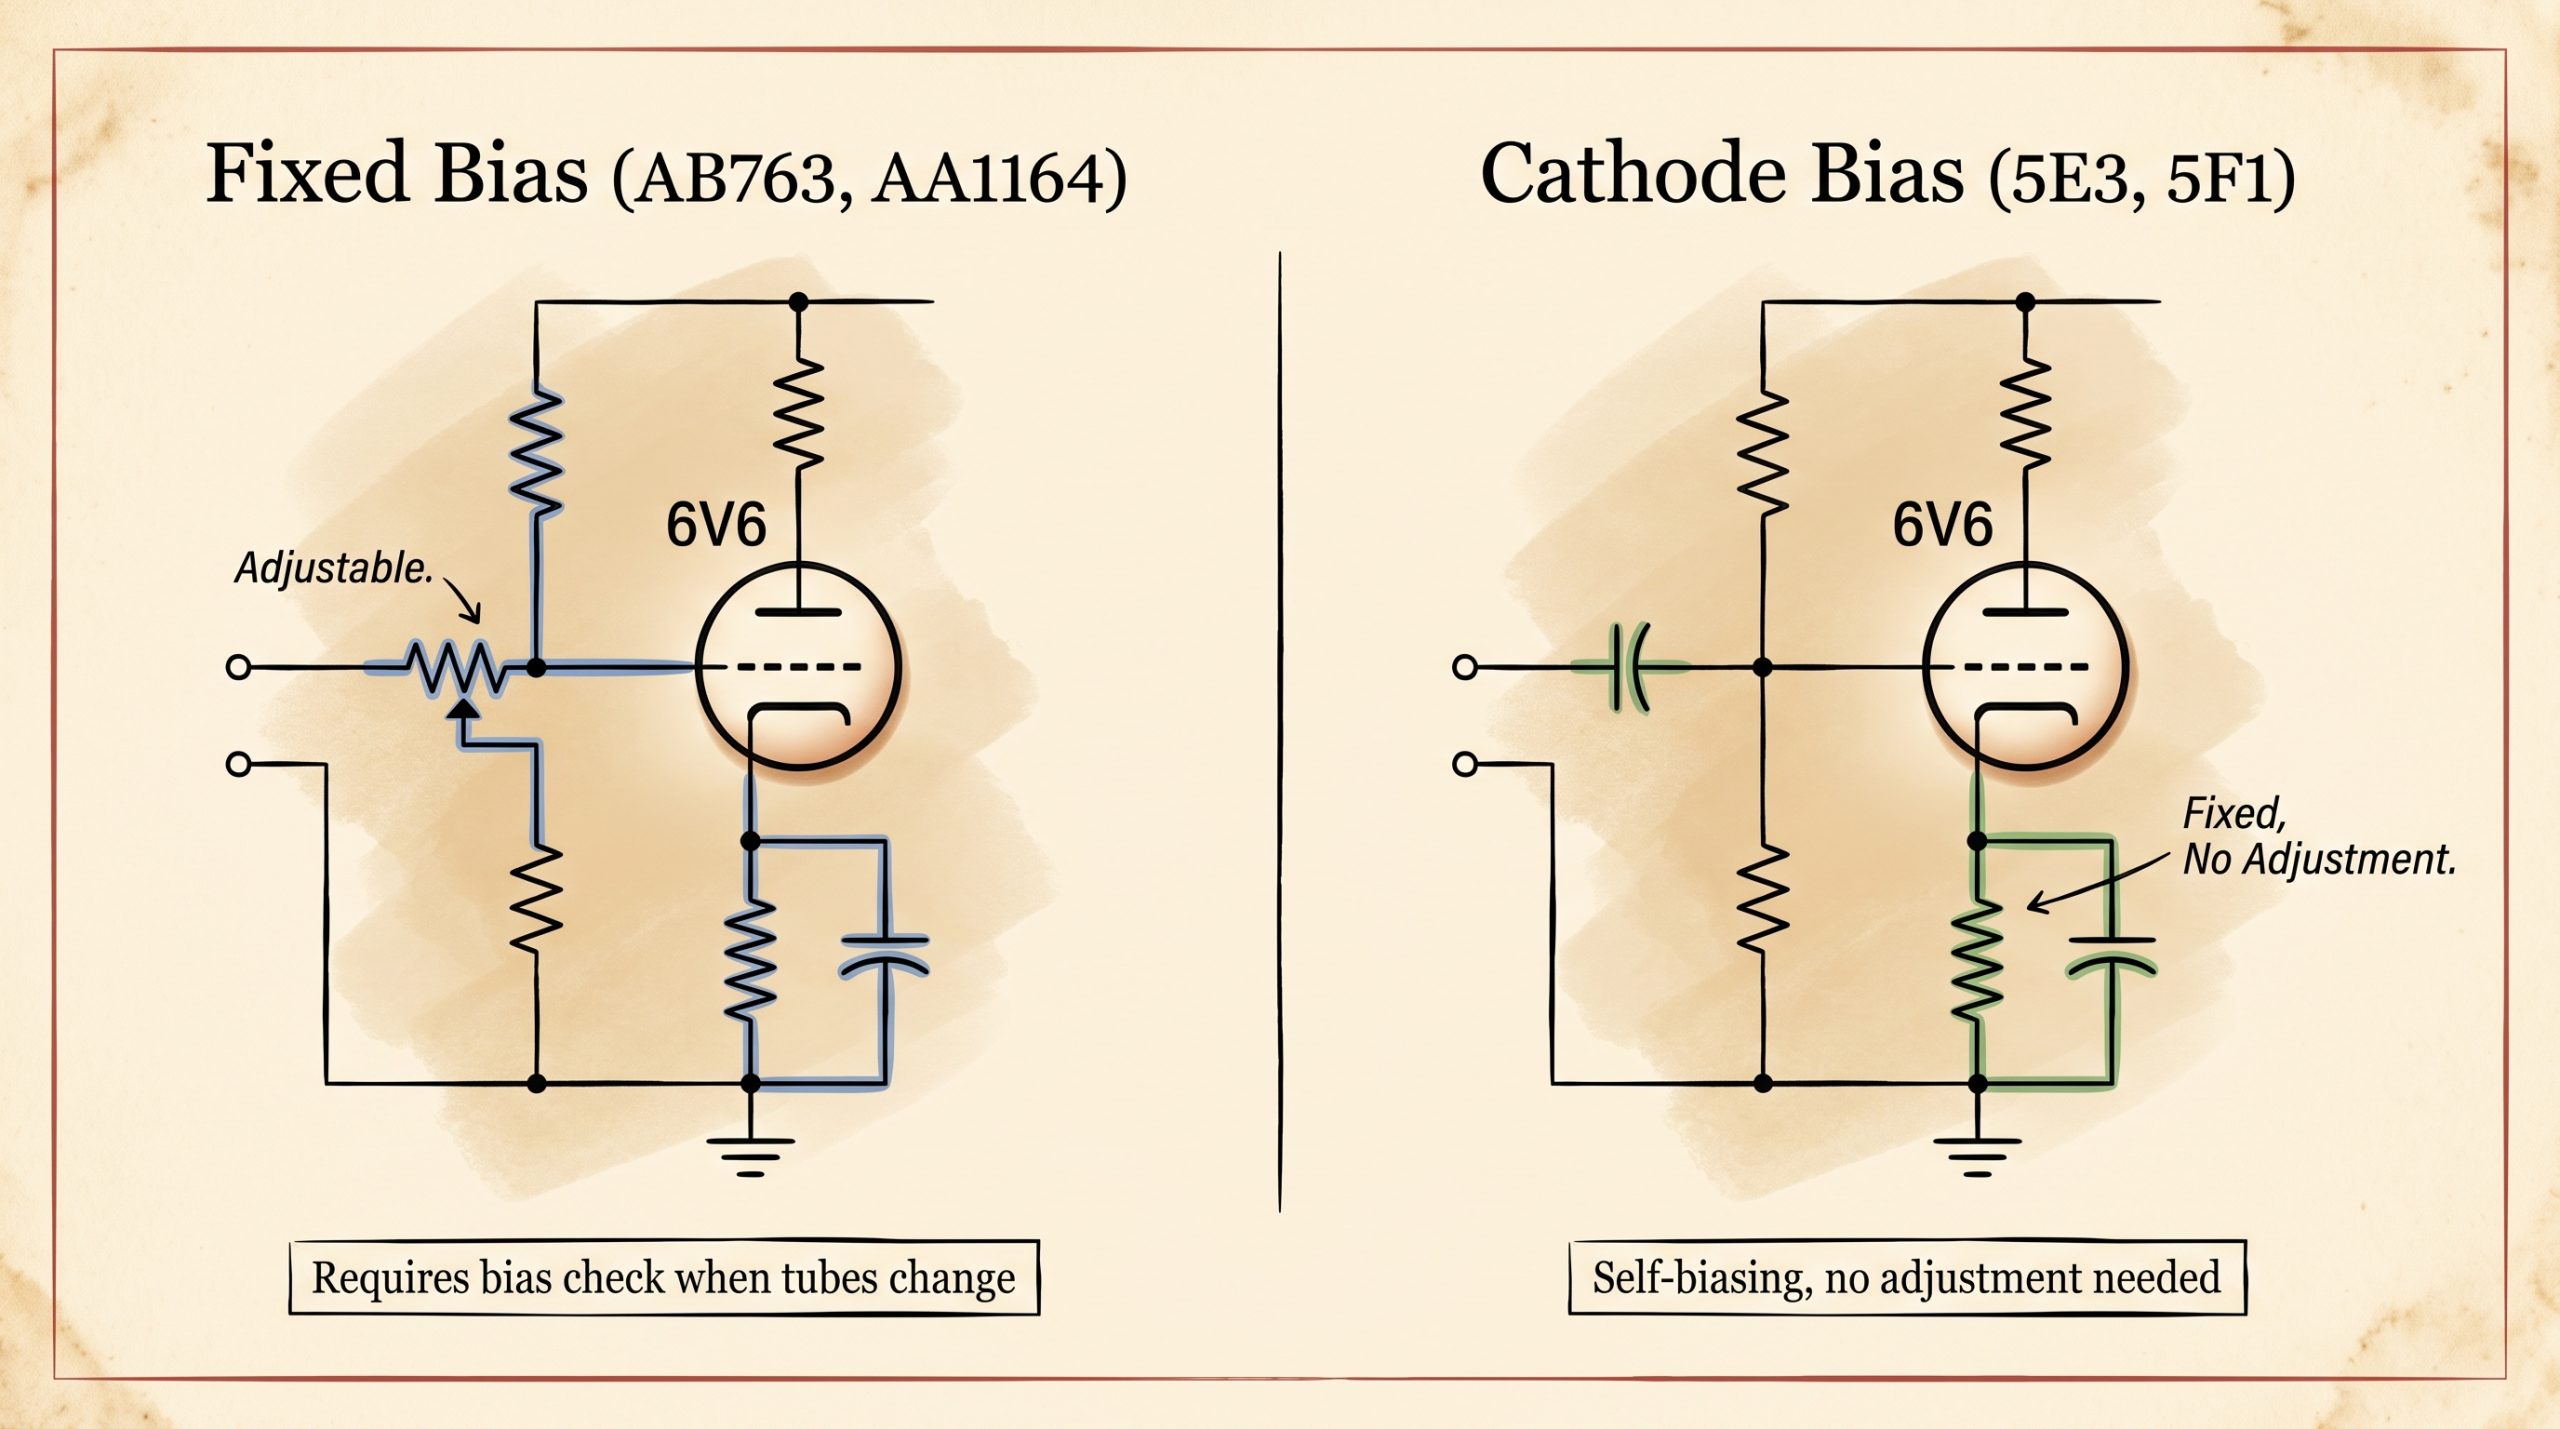
Visual comparison of fixed-bias (trimmer-adjusted) and cathode-bias (self-biasing) circuits. How to Spot Bias Drift Without a Multimeter
Symptoms of a Too-Hot Bias (Over-Biased)
Red-plating is the most obvious sign. If the metal plate inside a power tube glows orange or red during normal playing, the tube is dissipating far more than its rated maximum. Shut the amp off immediately. Running a red-plating tube risks burning the cathode coating, arcing inside the tube, and in worst cases, damaging the output transformer through overcurrent. Output transformers in vintage AB763 amps are not easily replaced.
Other signs of a bias that’s running too hot:
- Persistent 60Hz or 120Hz hum on the signal, particularly with the volume low
- Fuses blowing on power-up, especially after tubes were recently changed without a re-bias
- Tubes wearing out fast: a 6V6GT correctly biased at 70% should last 2,000–5,000 hours. Hot-biased, that same tube might last fewer than 500 hours.
- Glass envelope running unusually hot to a quick hand-proximity check (not a reliable measurement, but a grossly over-biased tube will be noticeably warmer than a correctly set one)
Symptoms of a Too-Cold Bias (Under-Biased)
Crossover distortion is the tell. It shows up as a harsh, gritty, almost transistor-like character, particularly at low to moderate volumes. The amp loses the spongy compression and spanky attack that 6V6 and 6L6 designs are known for. The sound feels stiff and unresponsive to picking dynamics.
Other symptoms:
- Thin midrange and poor low-end response
- Reduced output power: an under-biased Twin Reverb may only deliver 60% of its rated 85W
- Ice-pick treble that doesn’t respond to the tone controls the way it should
Normal Drift Schedule for Fender Amps
Bias should be checked every time output tubes are replaced. Beyond that, a working amp that gigs regularly warrants an annual check. An amp played occasionally at home every two years is a reasonable interval.
One factor specific to older amps: aging electrolytic filter capacitors lose capacitance over time. As capacitance drops, the B+ voltage can rise. A Fender blackface that was correctly biased five years ago may now be running its output tubes hotter simply because the main filter caps are tired, not because anyone touched the trimmer. If your amp has original filter caps from the 1960s and sounds noticeably different than it did a year ago, check the bias before assuming anything else is wrong. Caps that need replacement are a separate service, but understanding the connection matters.
Do 12AX7 Preamp Tubes Need to Be Biased?
No. All 12AX7, 12AT7, and 12AU7 preamp and driver tubes in Fender amps are cathode-biased via fixed resistors on the circuit board. The cathode resistor sets the operating point automatically, regardless of tube variation. There is no trimmer, no adjustment procedure, and no reason to touch anything when swapping preamp tubes.
One partial exception the 12AT7 phase inverter in Fender long-tail-pair inverter circuits (used in the AB763 and related circuits) operates at a point where a significantly weak or unusually strong tube can shift the balance between the two halves of the inverter. This produces a slight asymmetry in the push-pull output stage. The fix is tube selection, not biasing: use a matched or mid-spec 12AT7 in the inverter position rather than whatever’s at hand. Some techs prefer a specific brand for this position; it’s a matter of tube sorting, not electrical adjustment.
For a thorough look at preamp tube substitution across the whole 12AX7/12AT7/12AU7 family as used in Fender designs, the 12AX7 tube buyer’s guide covers gain factors, noise floors, and recommended brands by circuit position.
What to Do If You’re Not Sure
The bias procedure for Fender fixed-bias amps is straightforward once you’ve done it a few times. The math isn’t difficult. The tools are inexpensive. What requires respect is the voltage involved, and there’s no shame in acknowledging that high-voltage DC work isn’t comfortable territory for everyone. A professional bias service at $40–$80 is genuinely cheap relative to the value of a vintage Fender amp or the cost of a failed output transformer.
If you do the work yourself, log every measurement. Write down the date, the tube brand and lot number, the plate voltage at each socket, the cathode current at each socket, the calculated plate dissipation, and the final trimmer position. Six months from now, when the amp starts sounding different or a tube check is due, that log tells you exactly where things stood. It also tells you whether your B+ has drifted, which is useful diagnostic information for filter cap condition.
The core habit is simple: new output tubes always mean a bias check on any fixed-bias Fender. Do that consistently, and the procedure of how to bias a tube amp quickly becomes routine maintenance rather than a source of anxiety. Your tubes will last longer, your tone will be consistent, and the amp will tell you if something’s wrong through the symptoms described above long before any serious damage occurs. Tube amp bias isn’t a set-it-and-forget-it situation. It’s a maintenance interval, like an oil change, and about as complicated once you know the steps.
Frequently asked questions
What happens if I don't bias my tube amp?
If you install new power tubes in a fixed-bias Fender without re-biasing, the tubes will run at whatever current the trimmer last set, which is calibrated for the previous set of tubes. That may be too hot (red-plating, shortened tube life, blown fuses, possible output transformer damage) or too cold (crossover distortion, thin and harsh tone, reduced output power). At minimum, the tone suffers noticeably. At worst, output transformers in vintage AB763 circuits can fail. Original-spec replacement transformers for 1960s Fenders are scarce. Always re-bias after installing new power tubes in any Fender fixed-bias amp.
How do I bias a tube amp using a multimeter?
Measure the plate voltage at pin 3 of the output tube socket (red probe to pin 3, black to chassis ground, DMM set to 500V or 1000V DC). Then measure the cathode voltage across the 1-ohm cathode resistor at pin 8 using the millivolt DC range. The millivolt reading equals the plate current in milliamps. Multiply plate voltage by that current (converted to amps) to get plate dissipation in watts. Adjust the bias trimmer until dissipation reaches 70–80% of the tube's rated maximum. Re-measure after each small adjustment and allow 30 seconds for the readings to stabilize. The full step-by-step with worked numbers appears in the multimeter method section above.
How much does it cost to have a tube amp professionally biased?
A professional bias service at a qualified amp tech typically runs $40–$80 depending on region, amp complexity, and whether the tech needs to pull the chassis. That price generally doesn't include replacement tubes. For a vintage Fender with original-spec components, particularly an AB763 circuit with a matching output transformer, paying a tech who knows these circuits is cheap insurance. An incorrectly biased vintage amp that damages its original output transformer can cost hundreds of dollars in irreplaceable parts, assuming a correct replacement is even available.
What's the difference between a bias probe and using a multimeter?
A bias probe (TAD Bias Master, Weber Bias Rite, Amp RX Bias King) plugs between the power tube and its octal socket and reads plate current directly in milliamps. No math, no probing of live high-voltage nodes. A multimeter measures the millivolt drop across the 1-ohm cathode resistor and requires the plate dissipation calculation. Both methods produce accurate results when used correctly. The bias probe is faster and carries lower risk for someone new to the procedure, because it keeps your probes away from the 450V+ plate pins. The multimeter method requires no additional tools beyond what most hobbyists already own.
How often should I bias my Fender amp?
Bias should be checked every time output tubes are replaced, without exception, in any fixed-bias Fender. Beyond that, a gigged amp warrants a bias check once per year. An amp used occasionally at home can go two years between checks. One additional trigger: if your amp's filter capacitors are original vintage components, B+ voltage drift as those caps age can shift the bias point even with the trimmer untouched. Any time a Fender sounds noticeably different than it did a year ago and the tubes aren't new, check the bias and measure B+ before assuming anything more serious is wrong.